

Introduction In this tutorial, we’ll show you how to create and run a Status Check to monitor a service hosted on a…

Andre Newman
Technical Writer

Gremlin is a simple, safe and secure service for performing Chaos Engineering experiments through a SaaS-based platform. ALFI enables you to safely inject failure at the application level for full-stack resiliency, including serverless environments. Read more about ALFI on the Gremlin Blog. In this tutorial, we will walk you through using ALFI for the first time. You will create a simple Java SpringBoot Application, add the ALFI libraries to your application and run an ALFI attack.
ALFI is currently in an open beta.
The hello world of ALFI is failure injection at startup. We achieve this by triggering ALFI in the Java main method. You may have heard of Chaos Monkey, which provides the ability to perform a shutdown attack. This ALFI hello world example shows you how to throw an exception when your Java app is starting up. ALFI enables you to inject failure at any point in your code.
Before you begin this tutorial, you’ll need the following:
This tutorial will walk you through the required steps to run a Chaos Engineering experiment using Application Level Failure Injection.
After you’ve downloaded Java 8 and the IDE, let’s verify the Java version is the one we need to run this tutorial. On your terminal you can check the version with:
1java -version
You want the response to include something like:
1java version "1.8.0_202"
Now verify that the Java JDK is installed by checking the Java compiler:
1javac -version
You’ll see the following output:
1javac 1.8.0_202
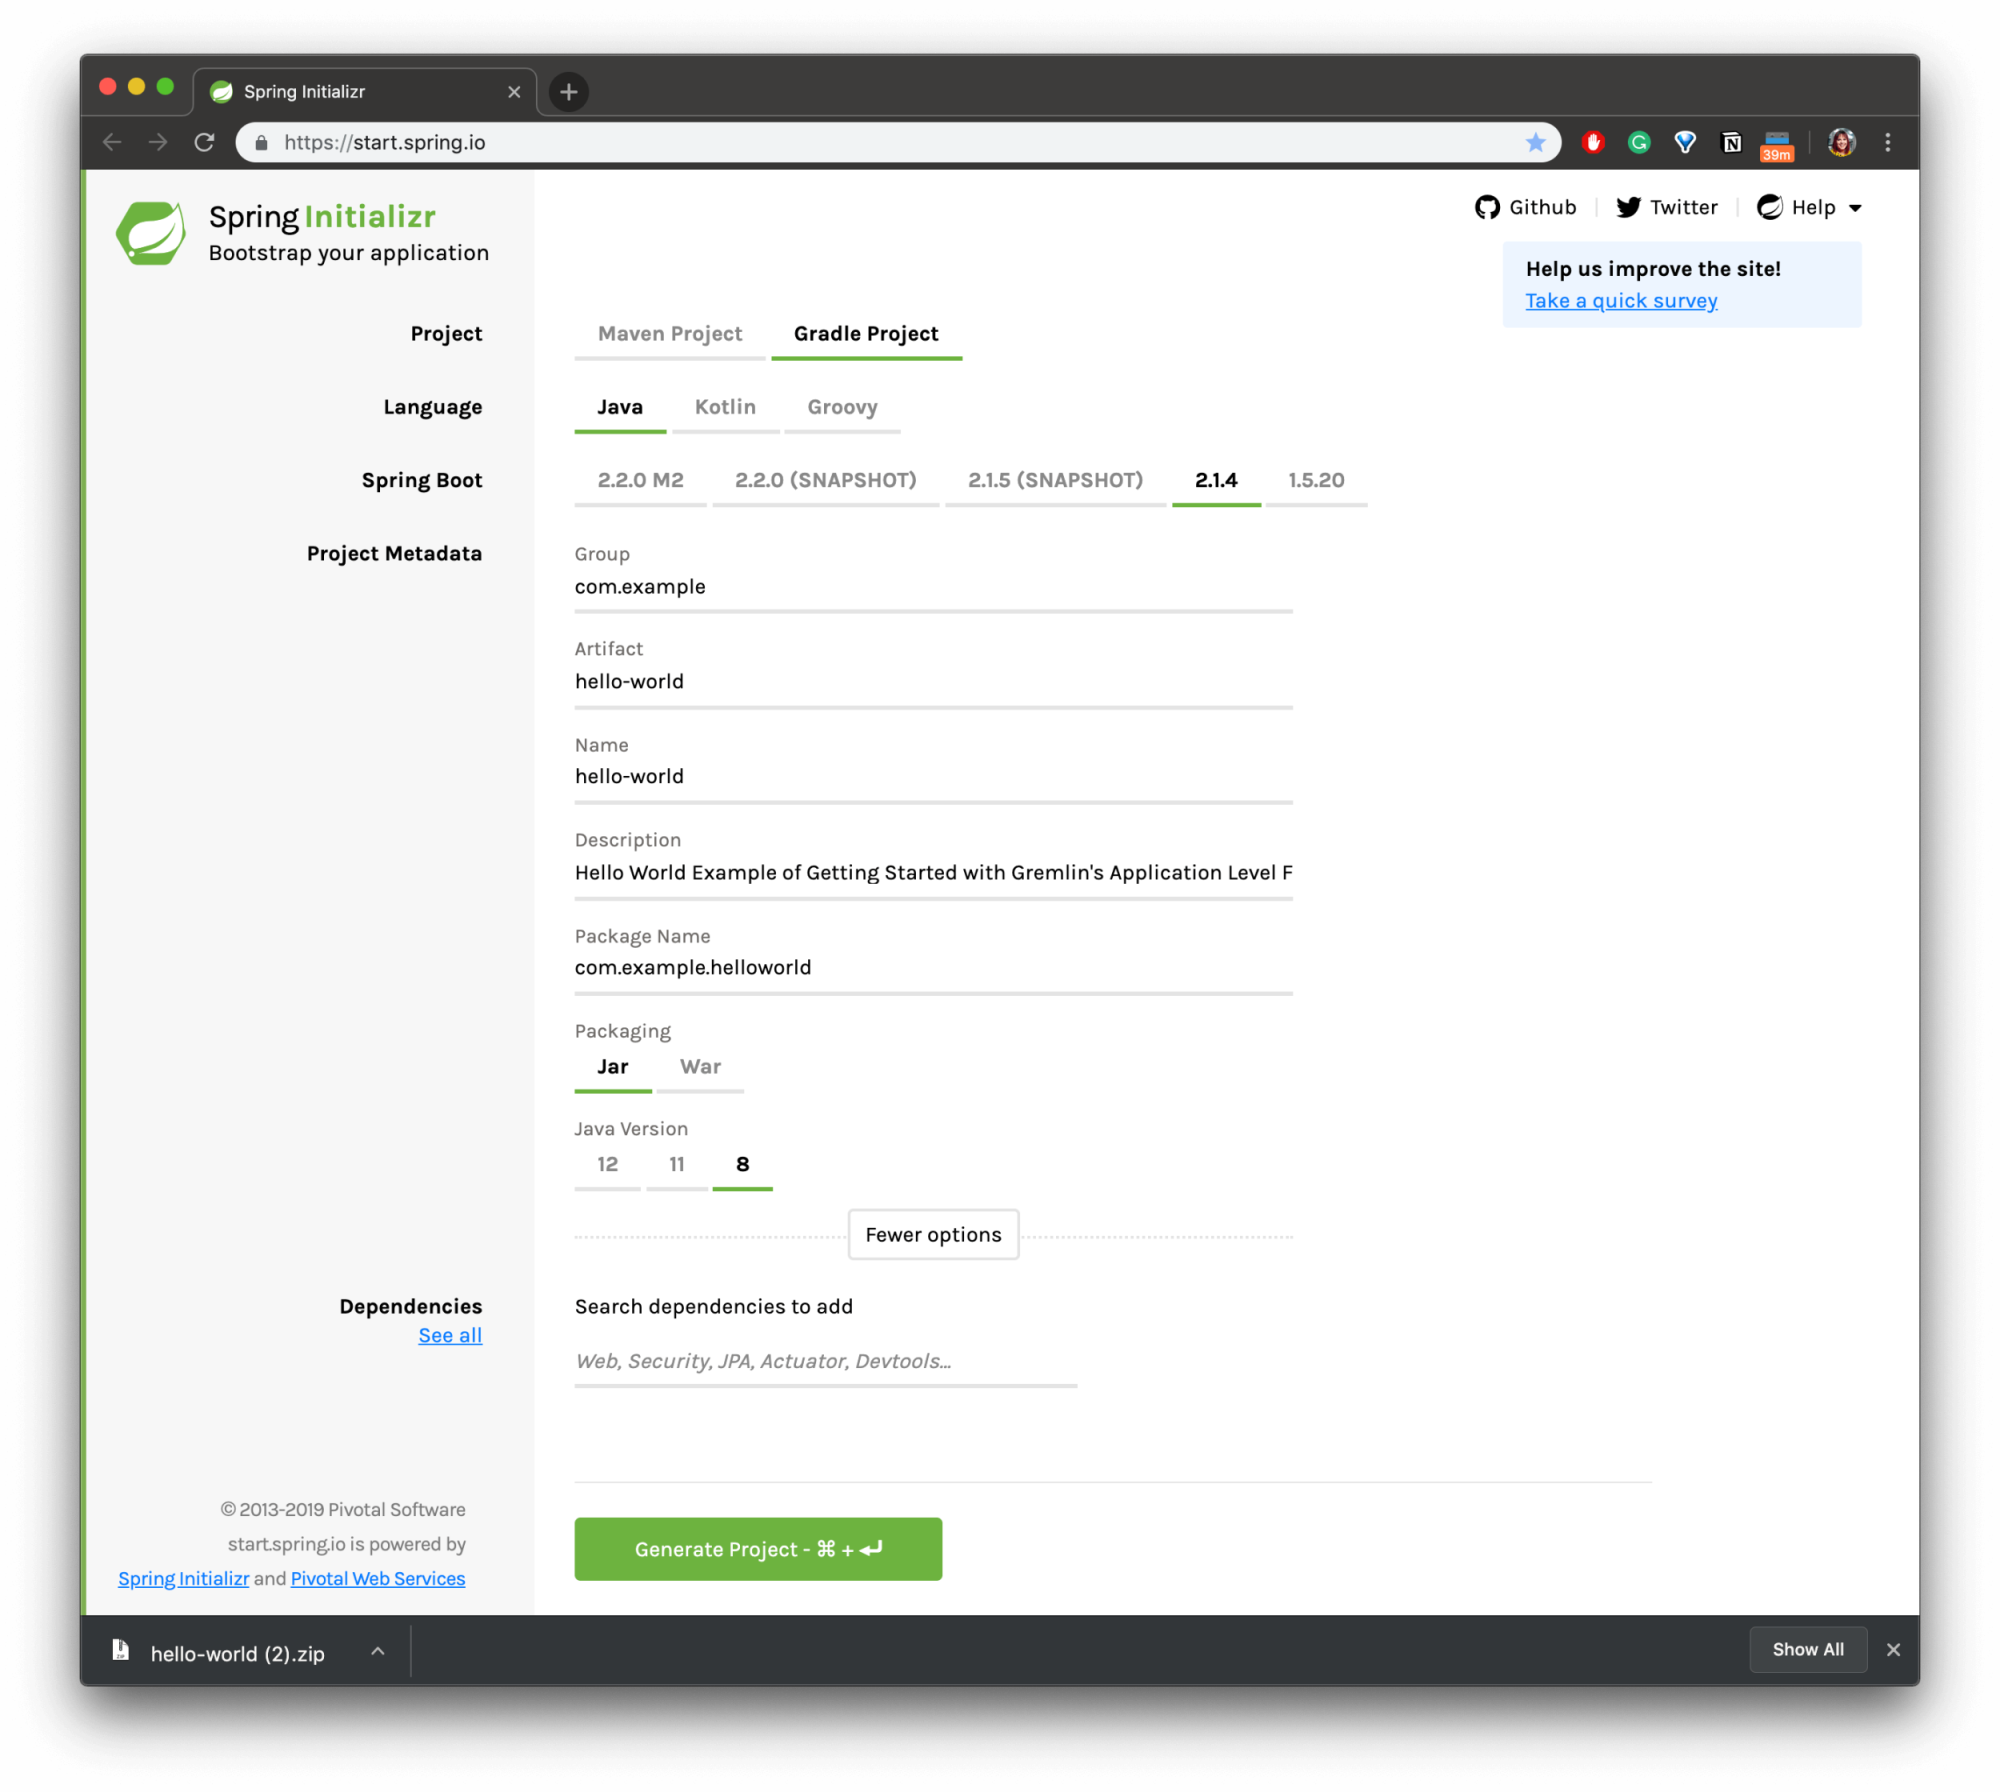
In this step, you’ll use Spring Initializr to start a new Java application then import it to our IDE, IntelliJ, to start developing.
Visit here to bootstrap a Java application using Spring. We are going to select “Gradle Project” and leave com.example as the Group, while we name the Artifact hello-world. Select “More options”, to make sure you’re using Java 8. Feel free to add a description if you wish, we will use “Hello World Example of Getting Started with Gremlin's Application Level Failure Injection.” Press the “Generate Project” to download the source code and resources needed as a compressed (zip) file. Move and unzip the folder to somewhere you can find it.
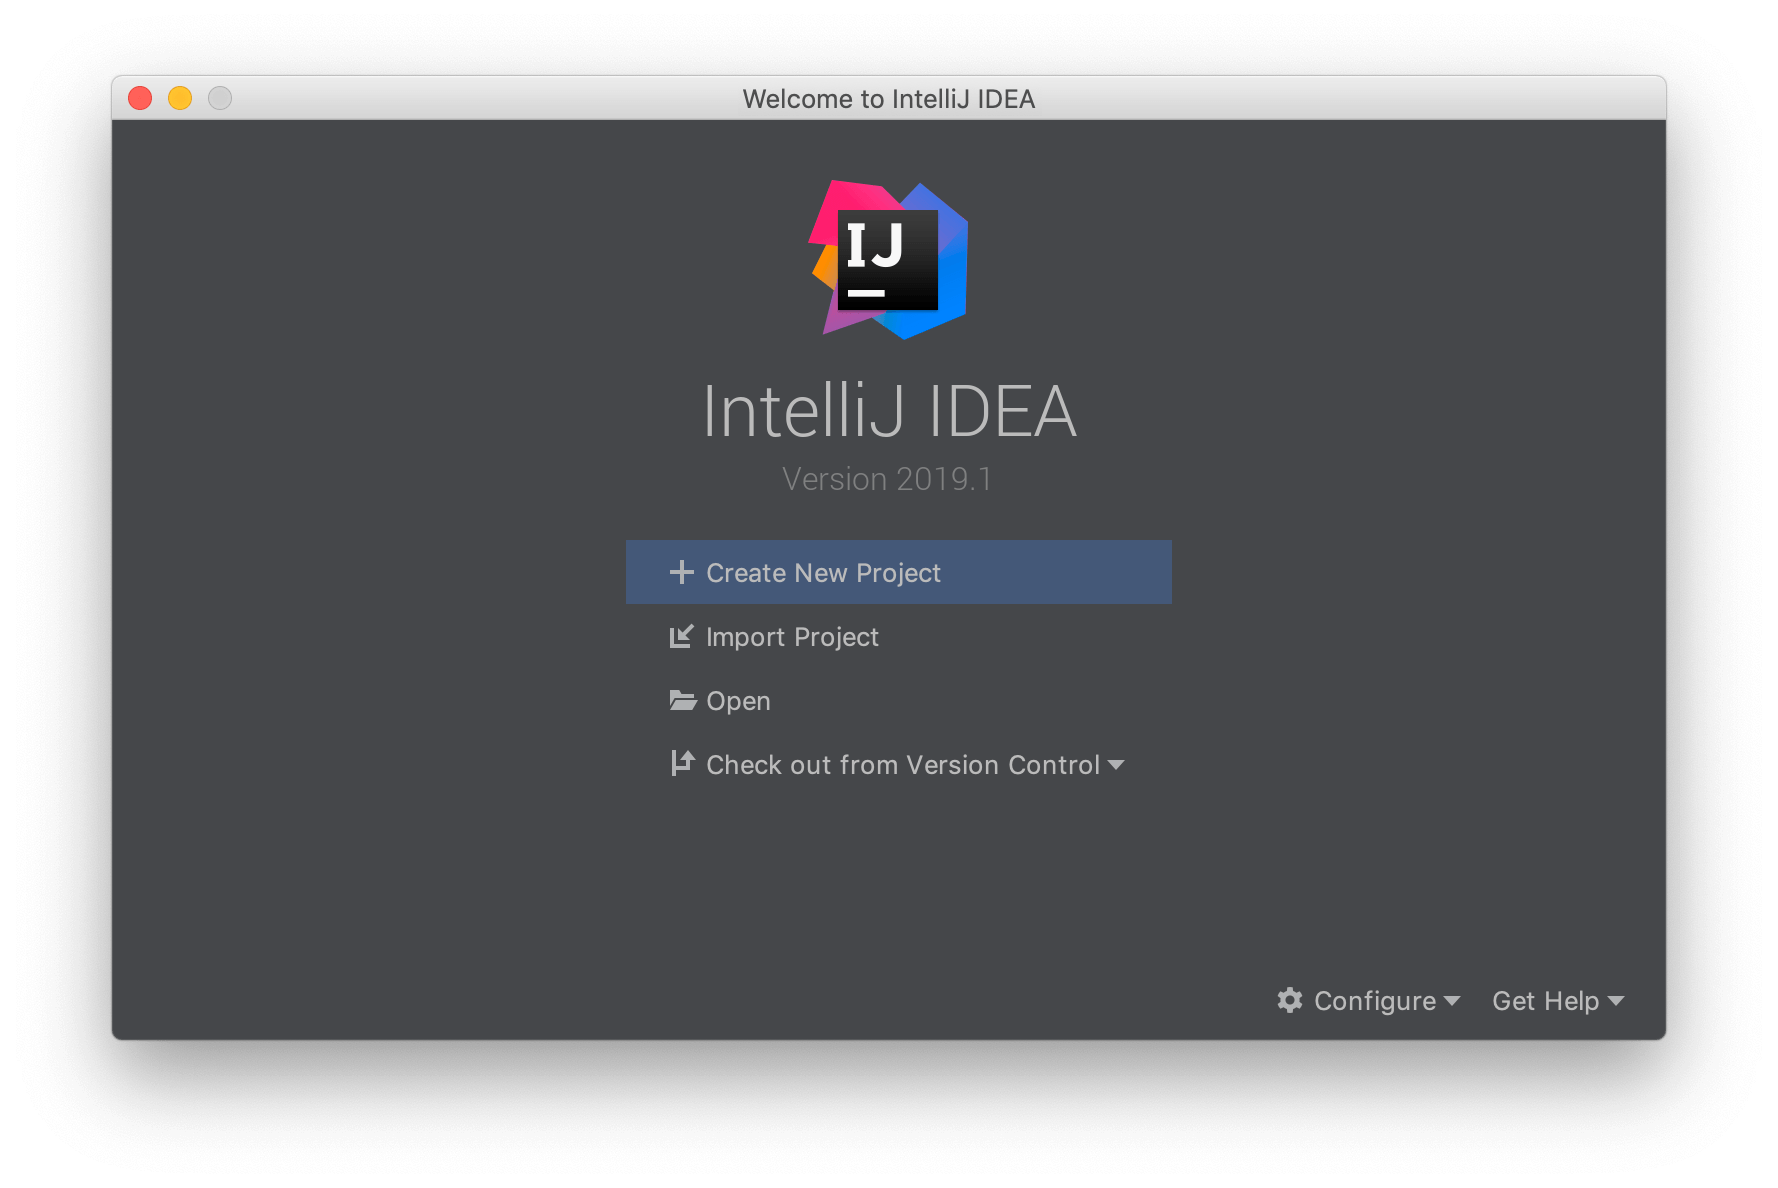
We are going to be using IntelliJ as our IDE, you can download it here.
After downloading and installing IntelliJ IDEA, we are going to launch the application and click “Import Project”:
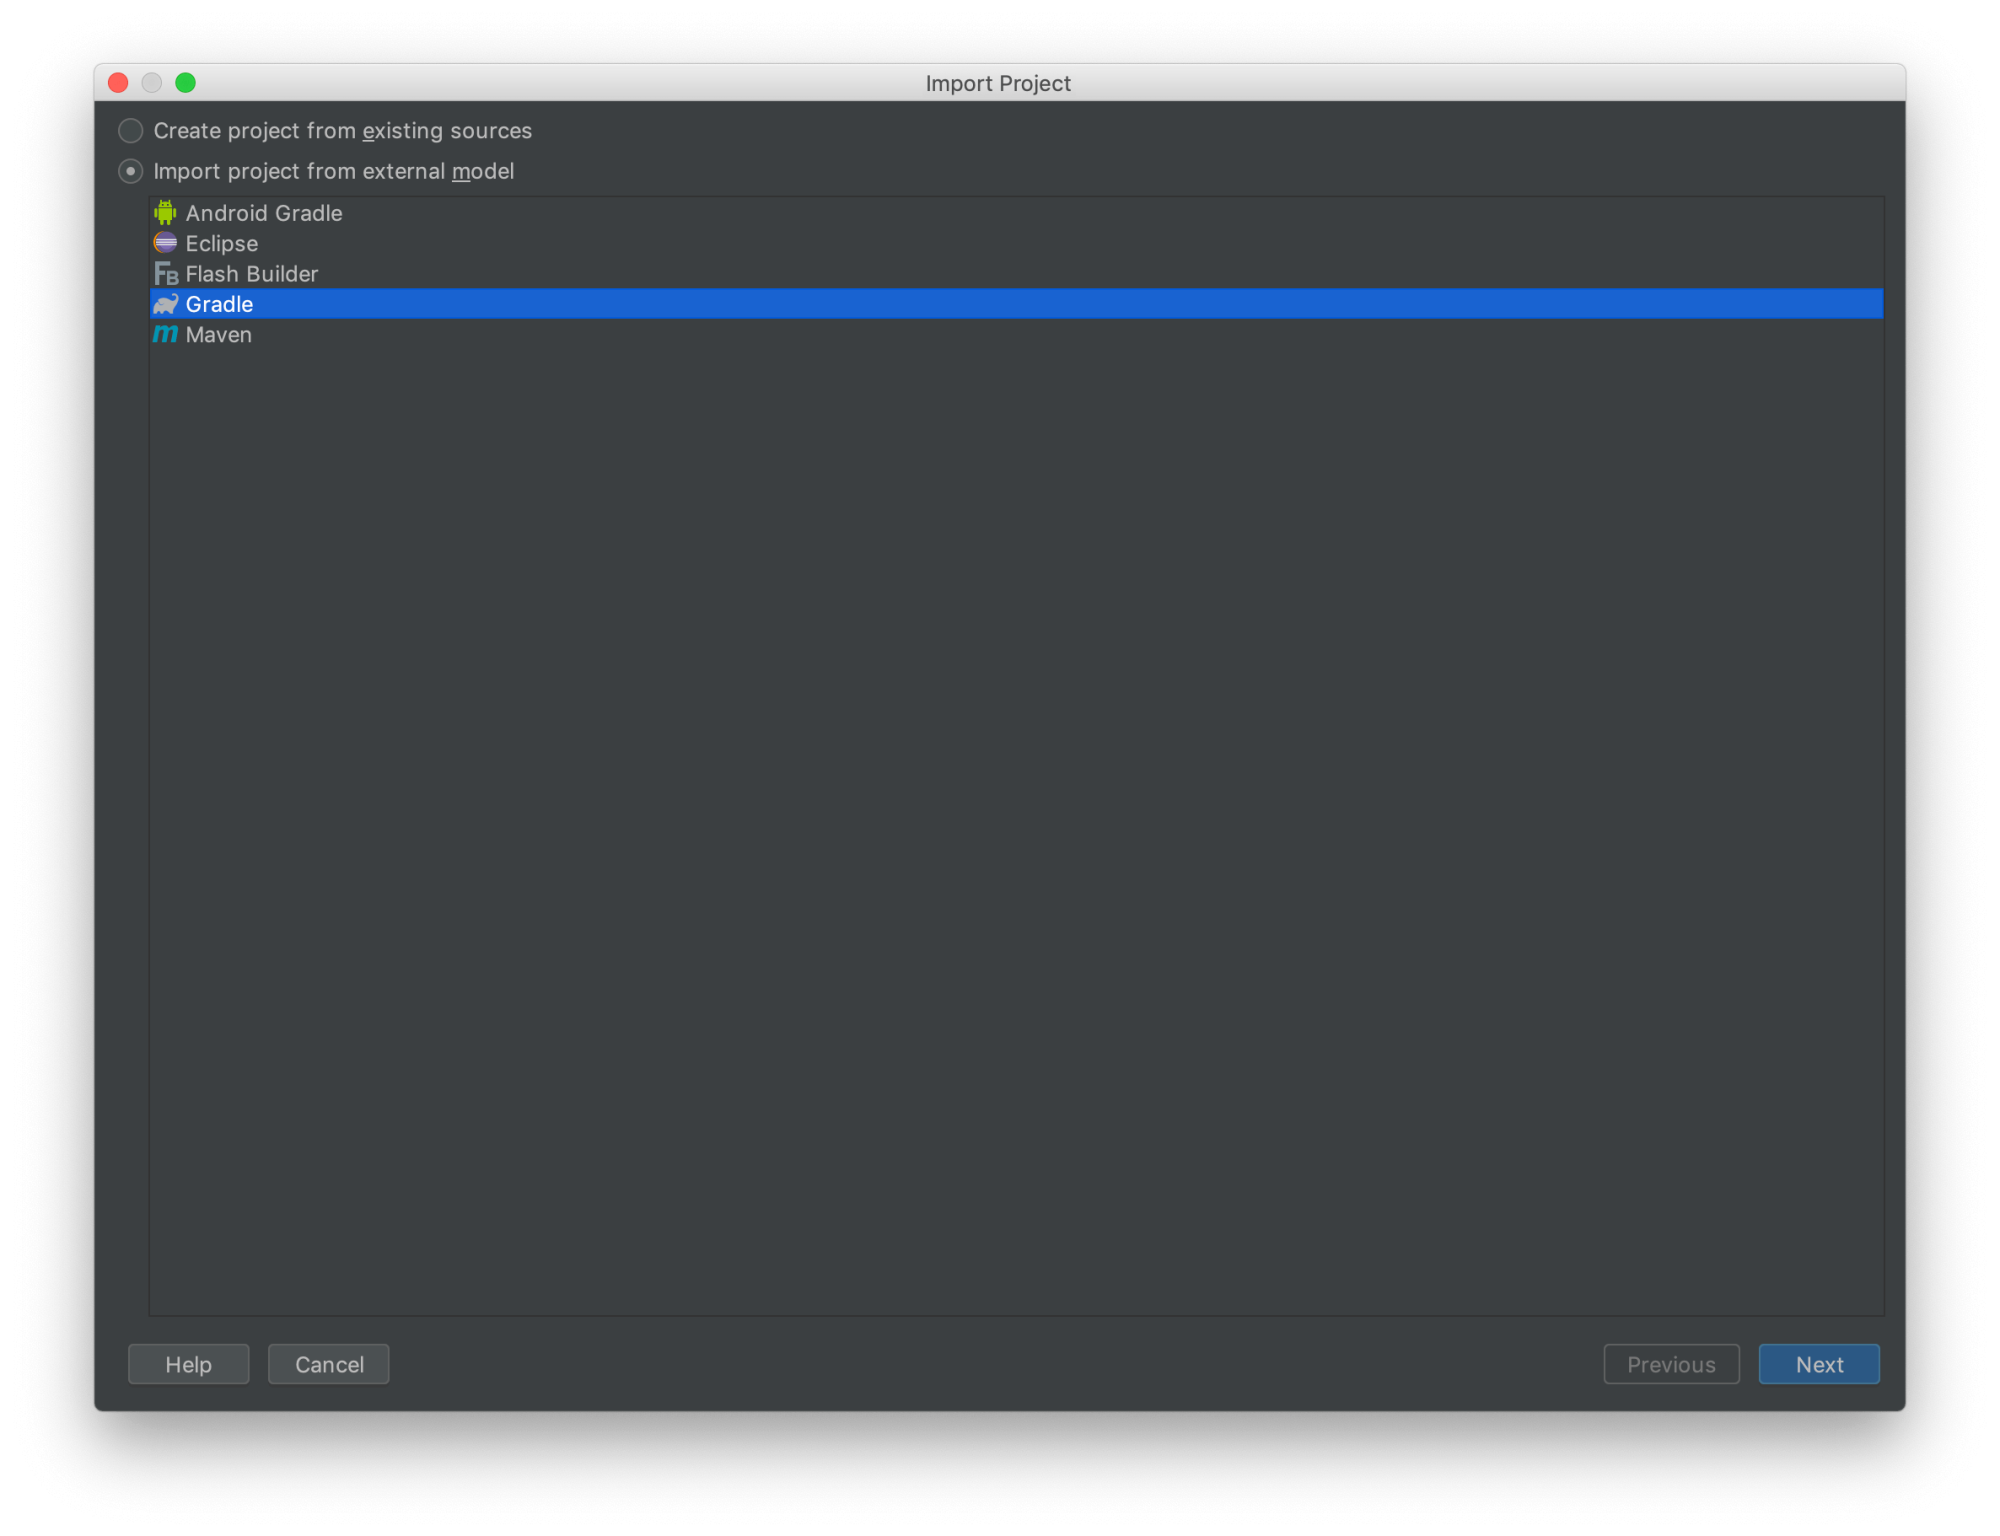
Import the project by selecting the unzipped folder, then under ‘Import Project from external model”, select Gradle and make sure to check the checkbox to auto-import and to use the default gradle wrapper.
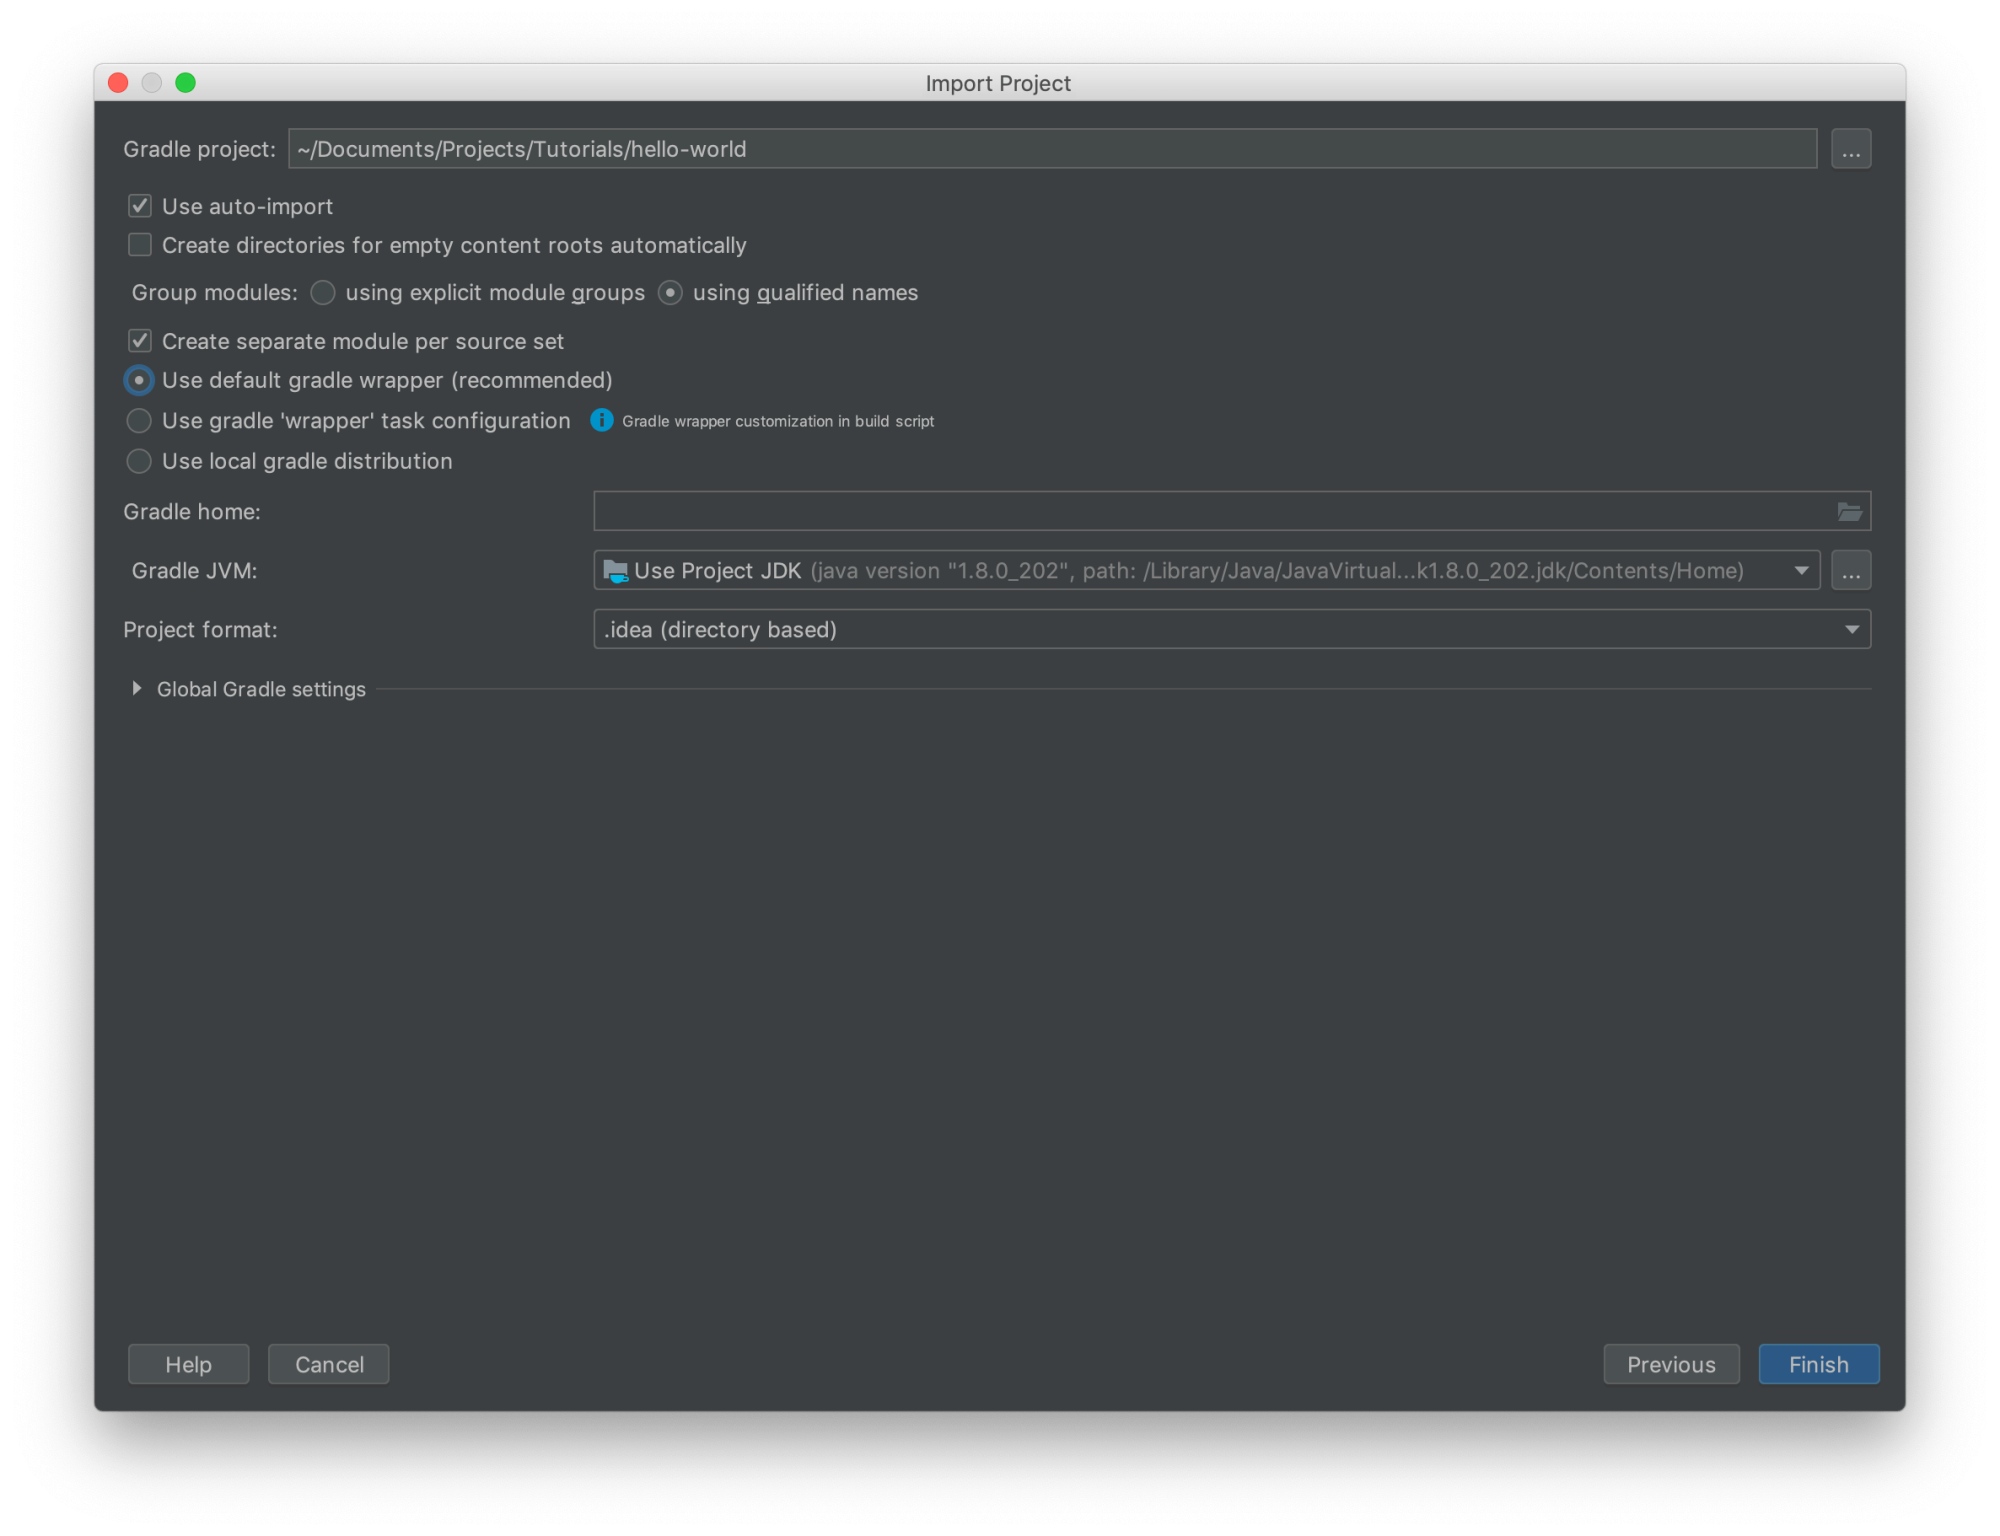
Make sure to select the finish button, and you’ll see the IDE populate with all the source code.
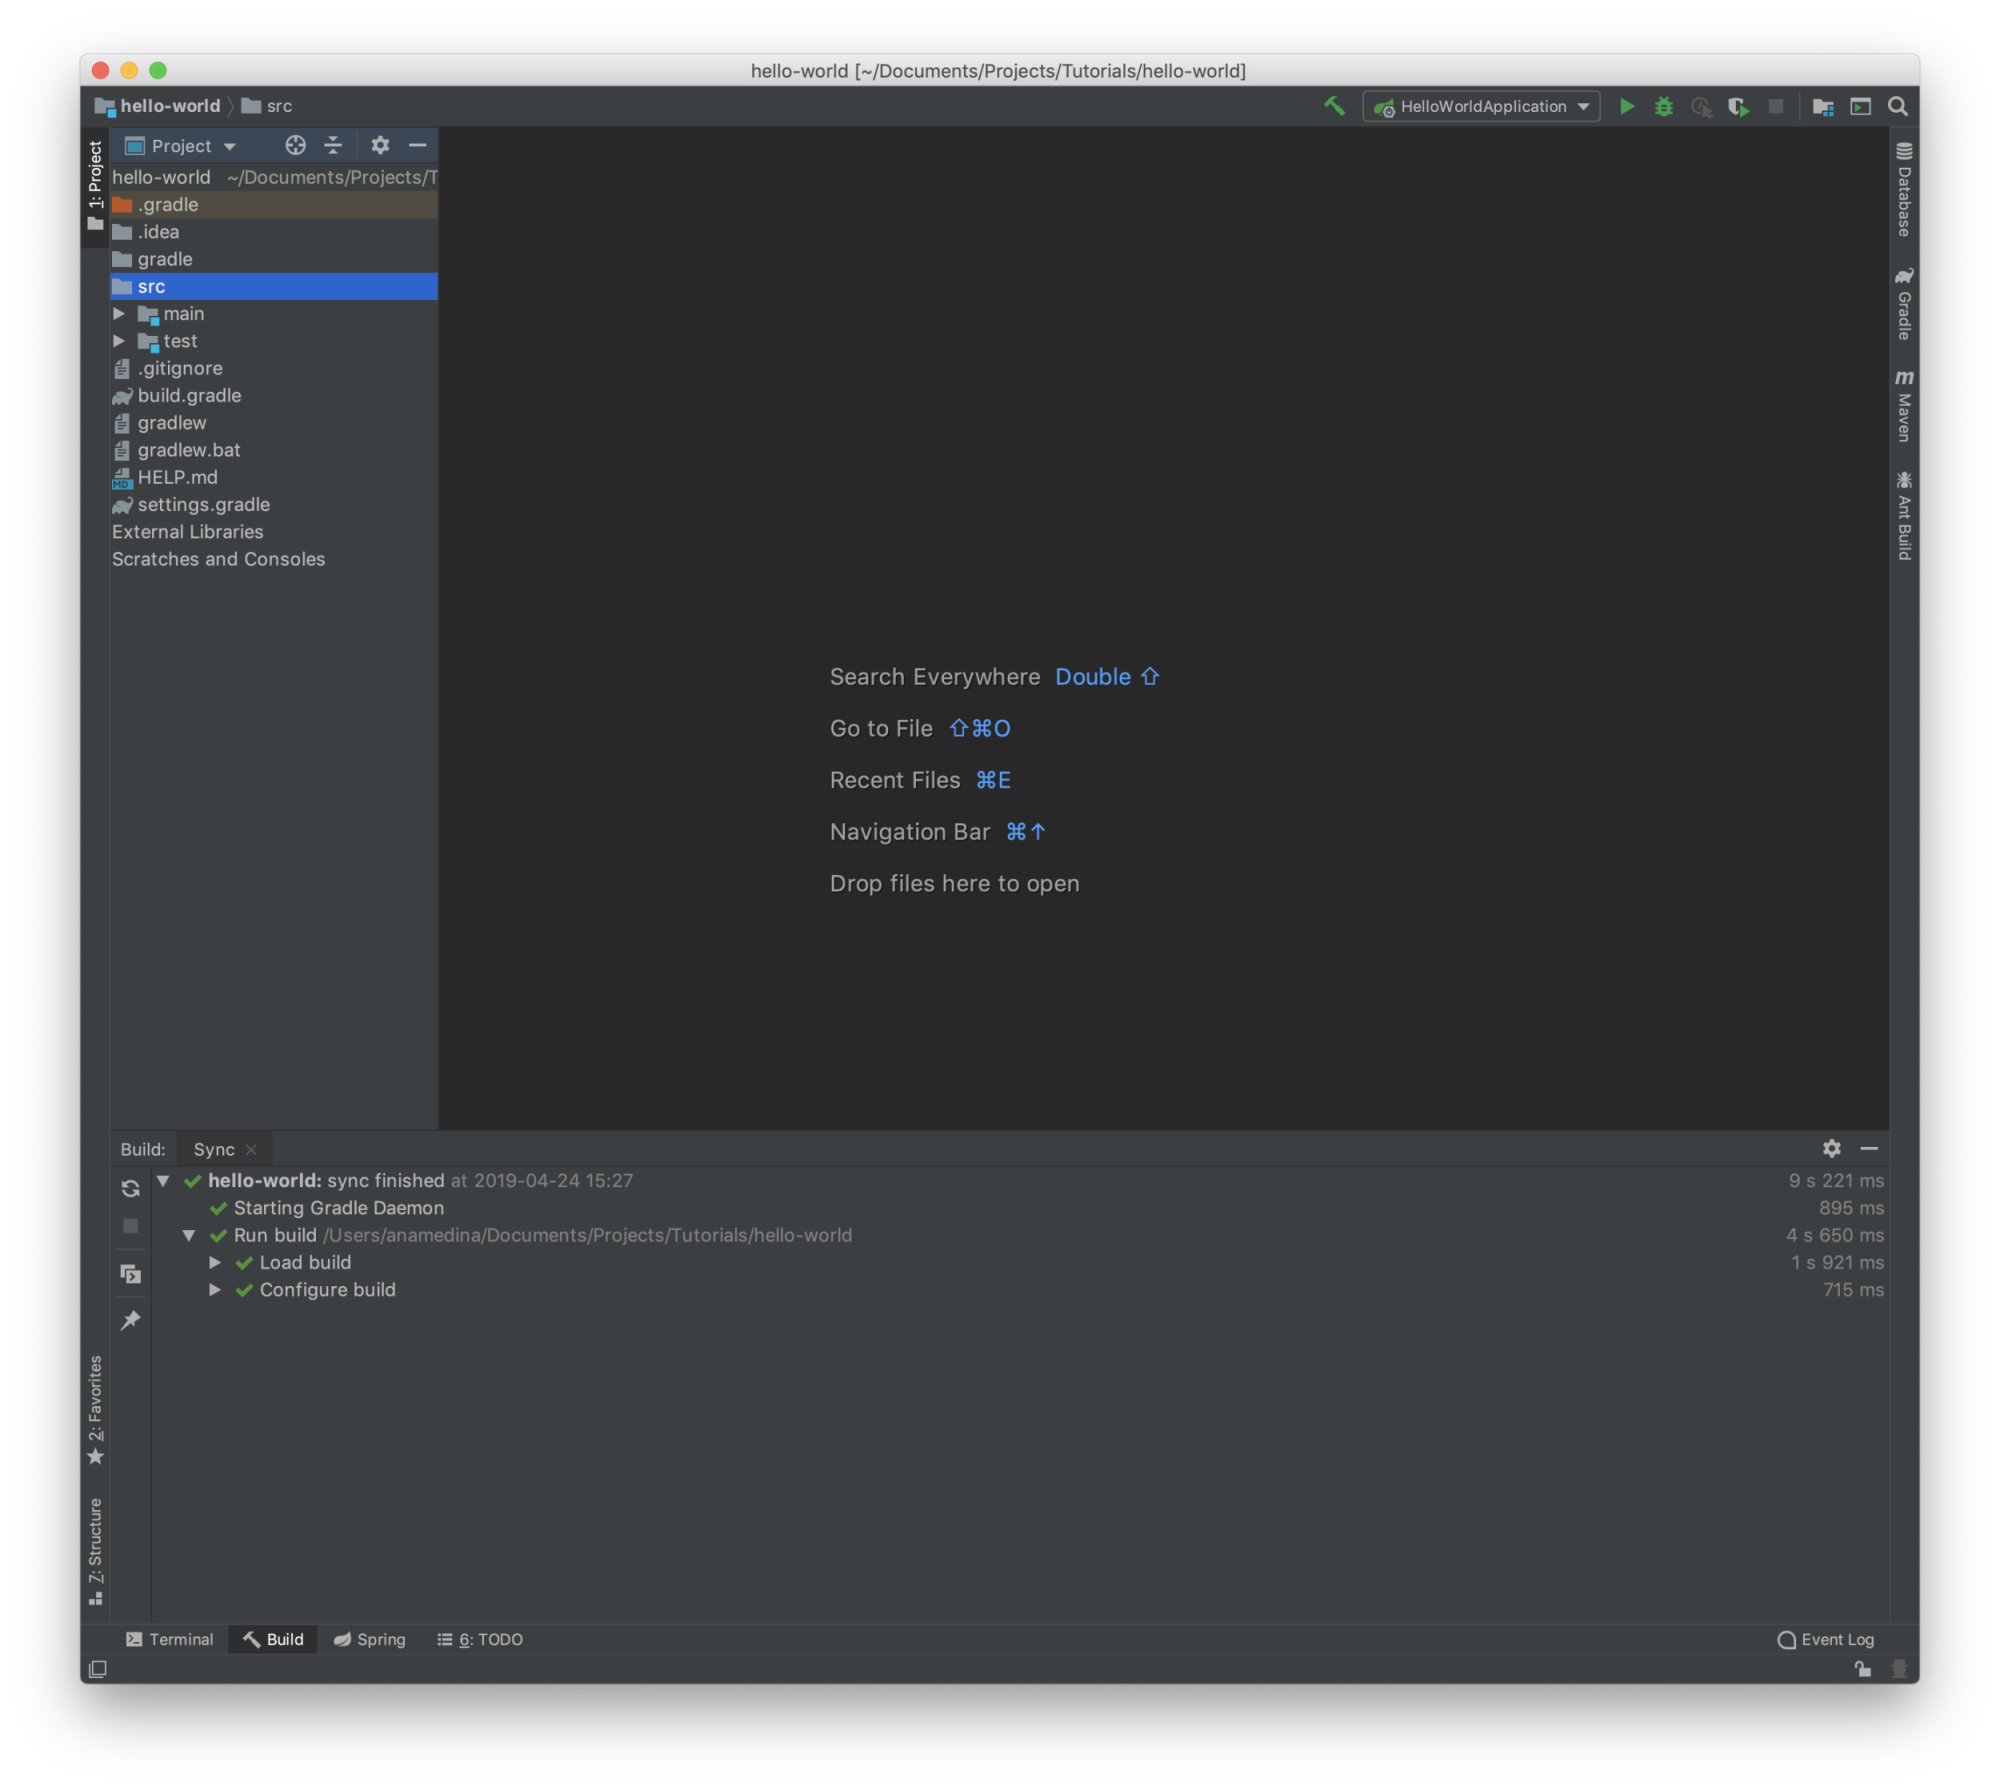
In this step, you’ll be using the build.gradle profile Spring Initializer has created for us, it looks like this after download. You can open this file by finding it on the left navigation bar under the hello-world Project.
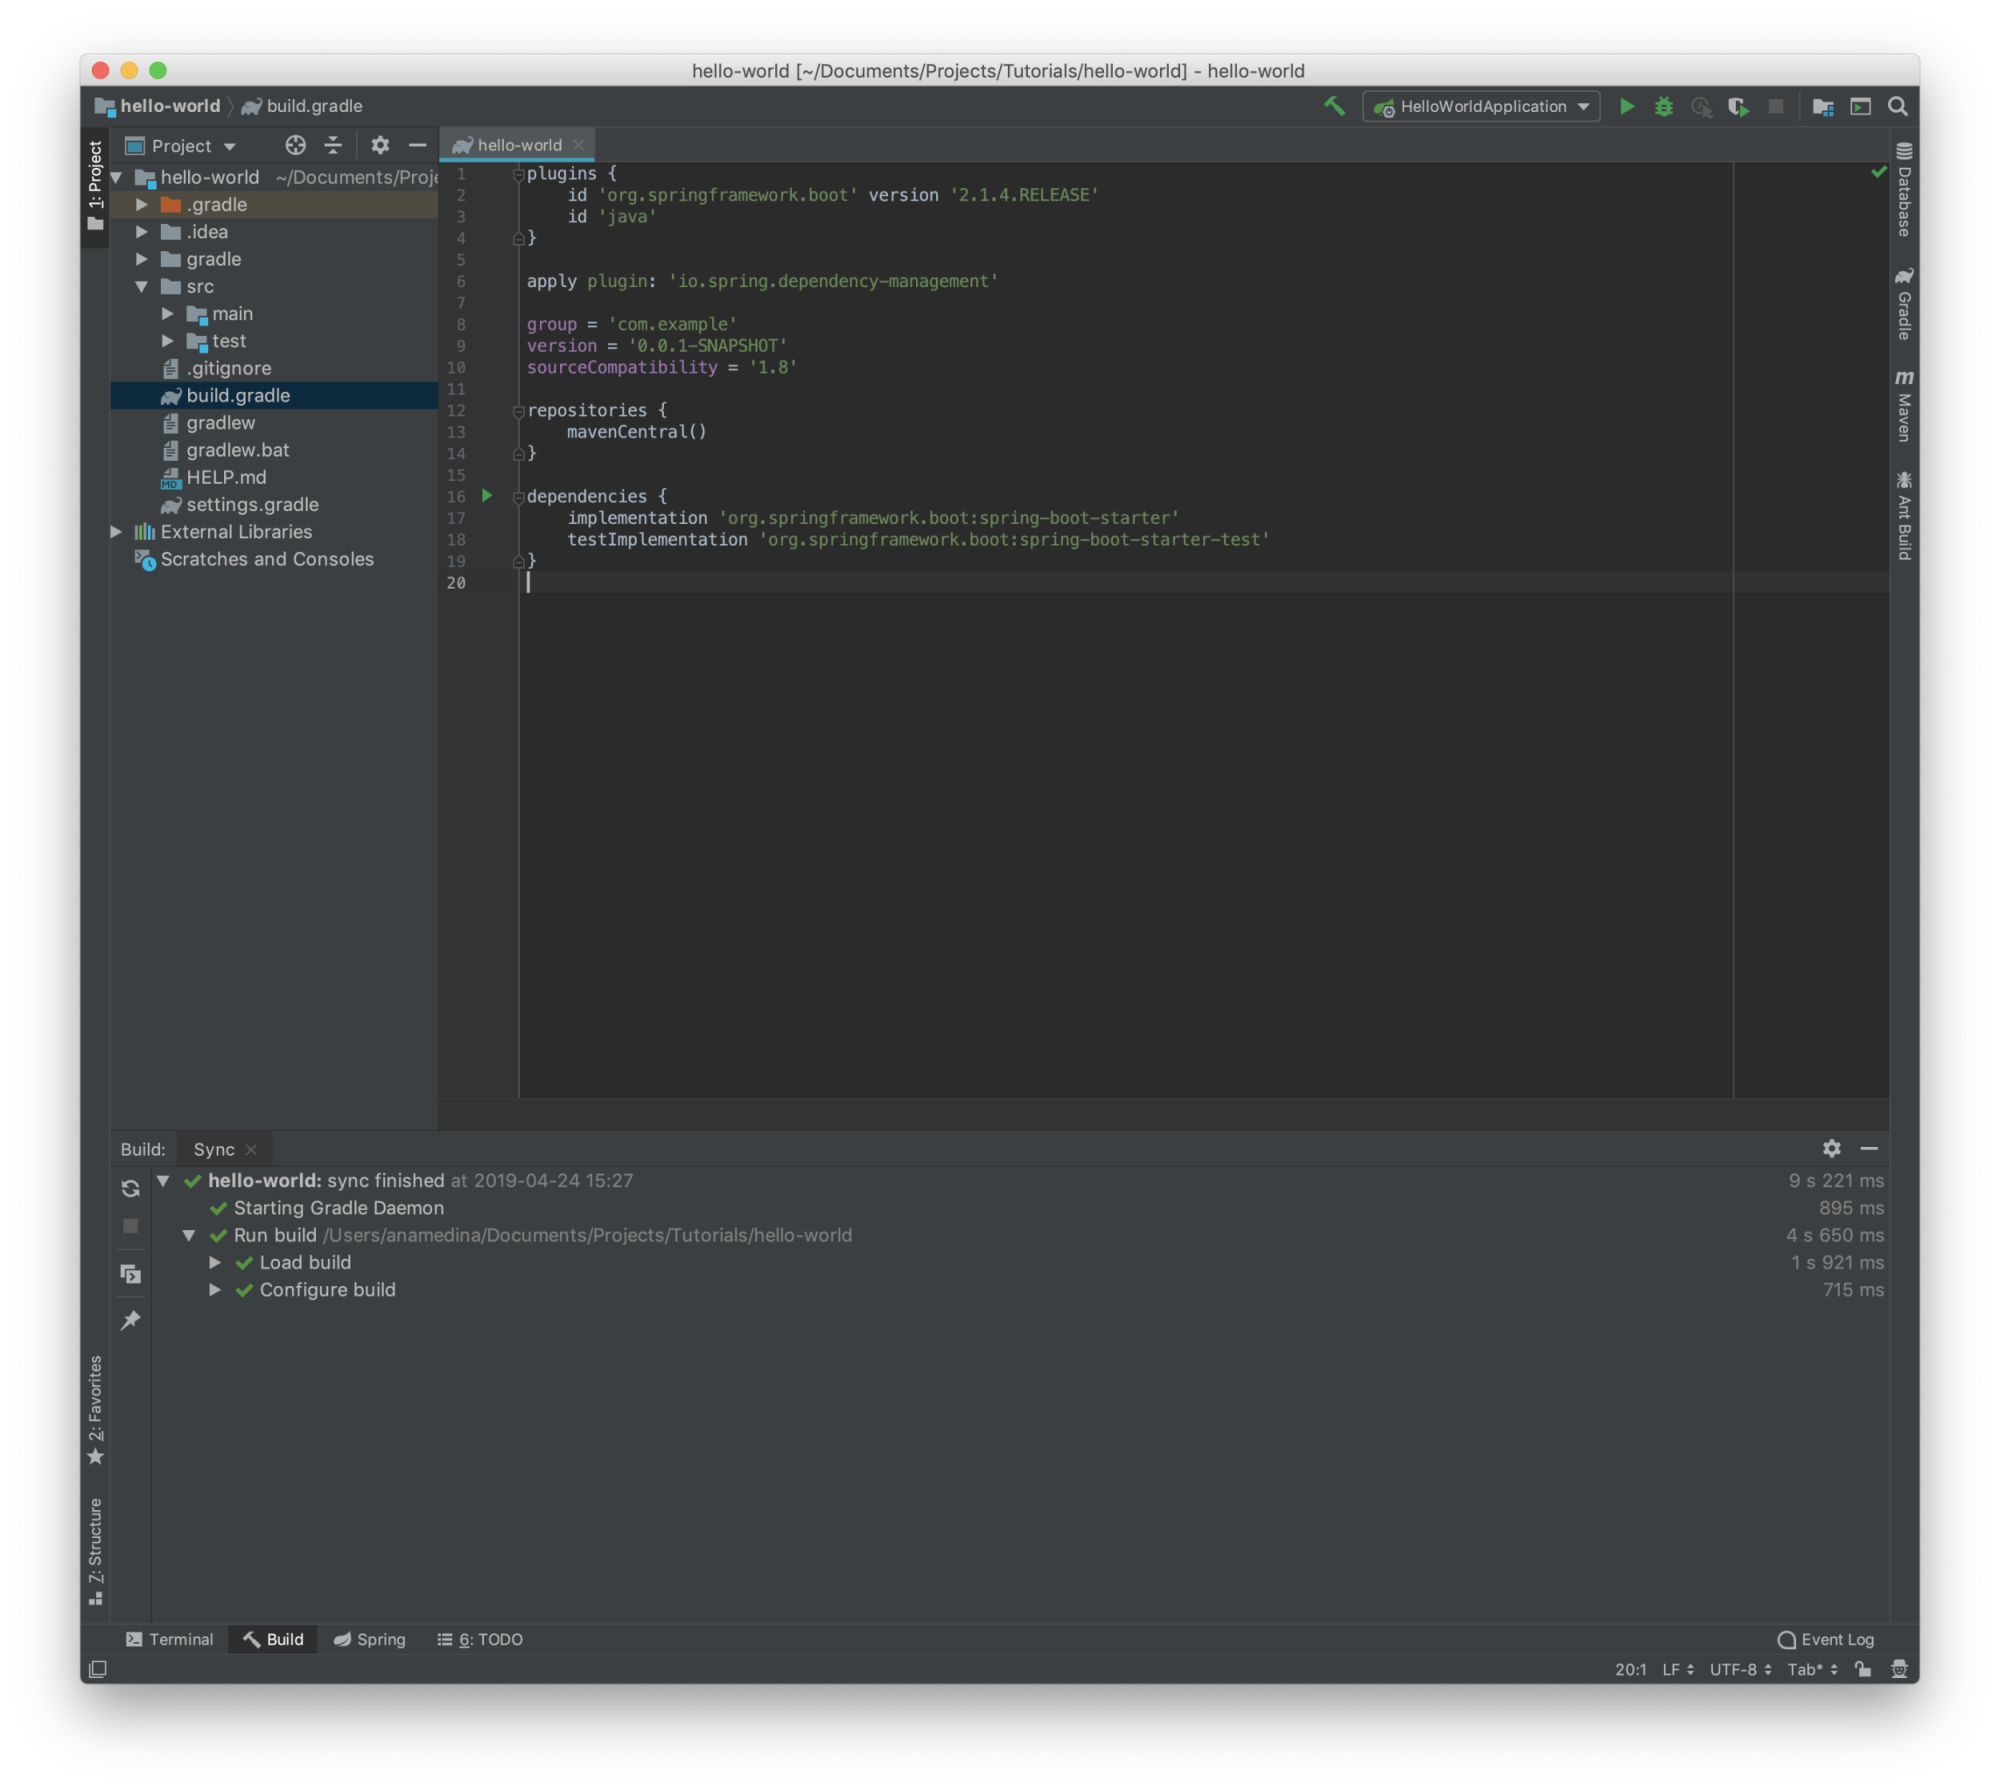
We can start by connecting to the ALFI Maven repository, by adding this under repositories:
1maven {23 url 'https://maven.gremlin.com/'45 }
After we are going to add our dependencies, in this case, it will be the alfi-core. Add this below the other dependencies
1compile group: 'com.gremlin', name: 'alfi-core', version: '0+'
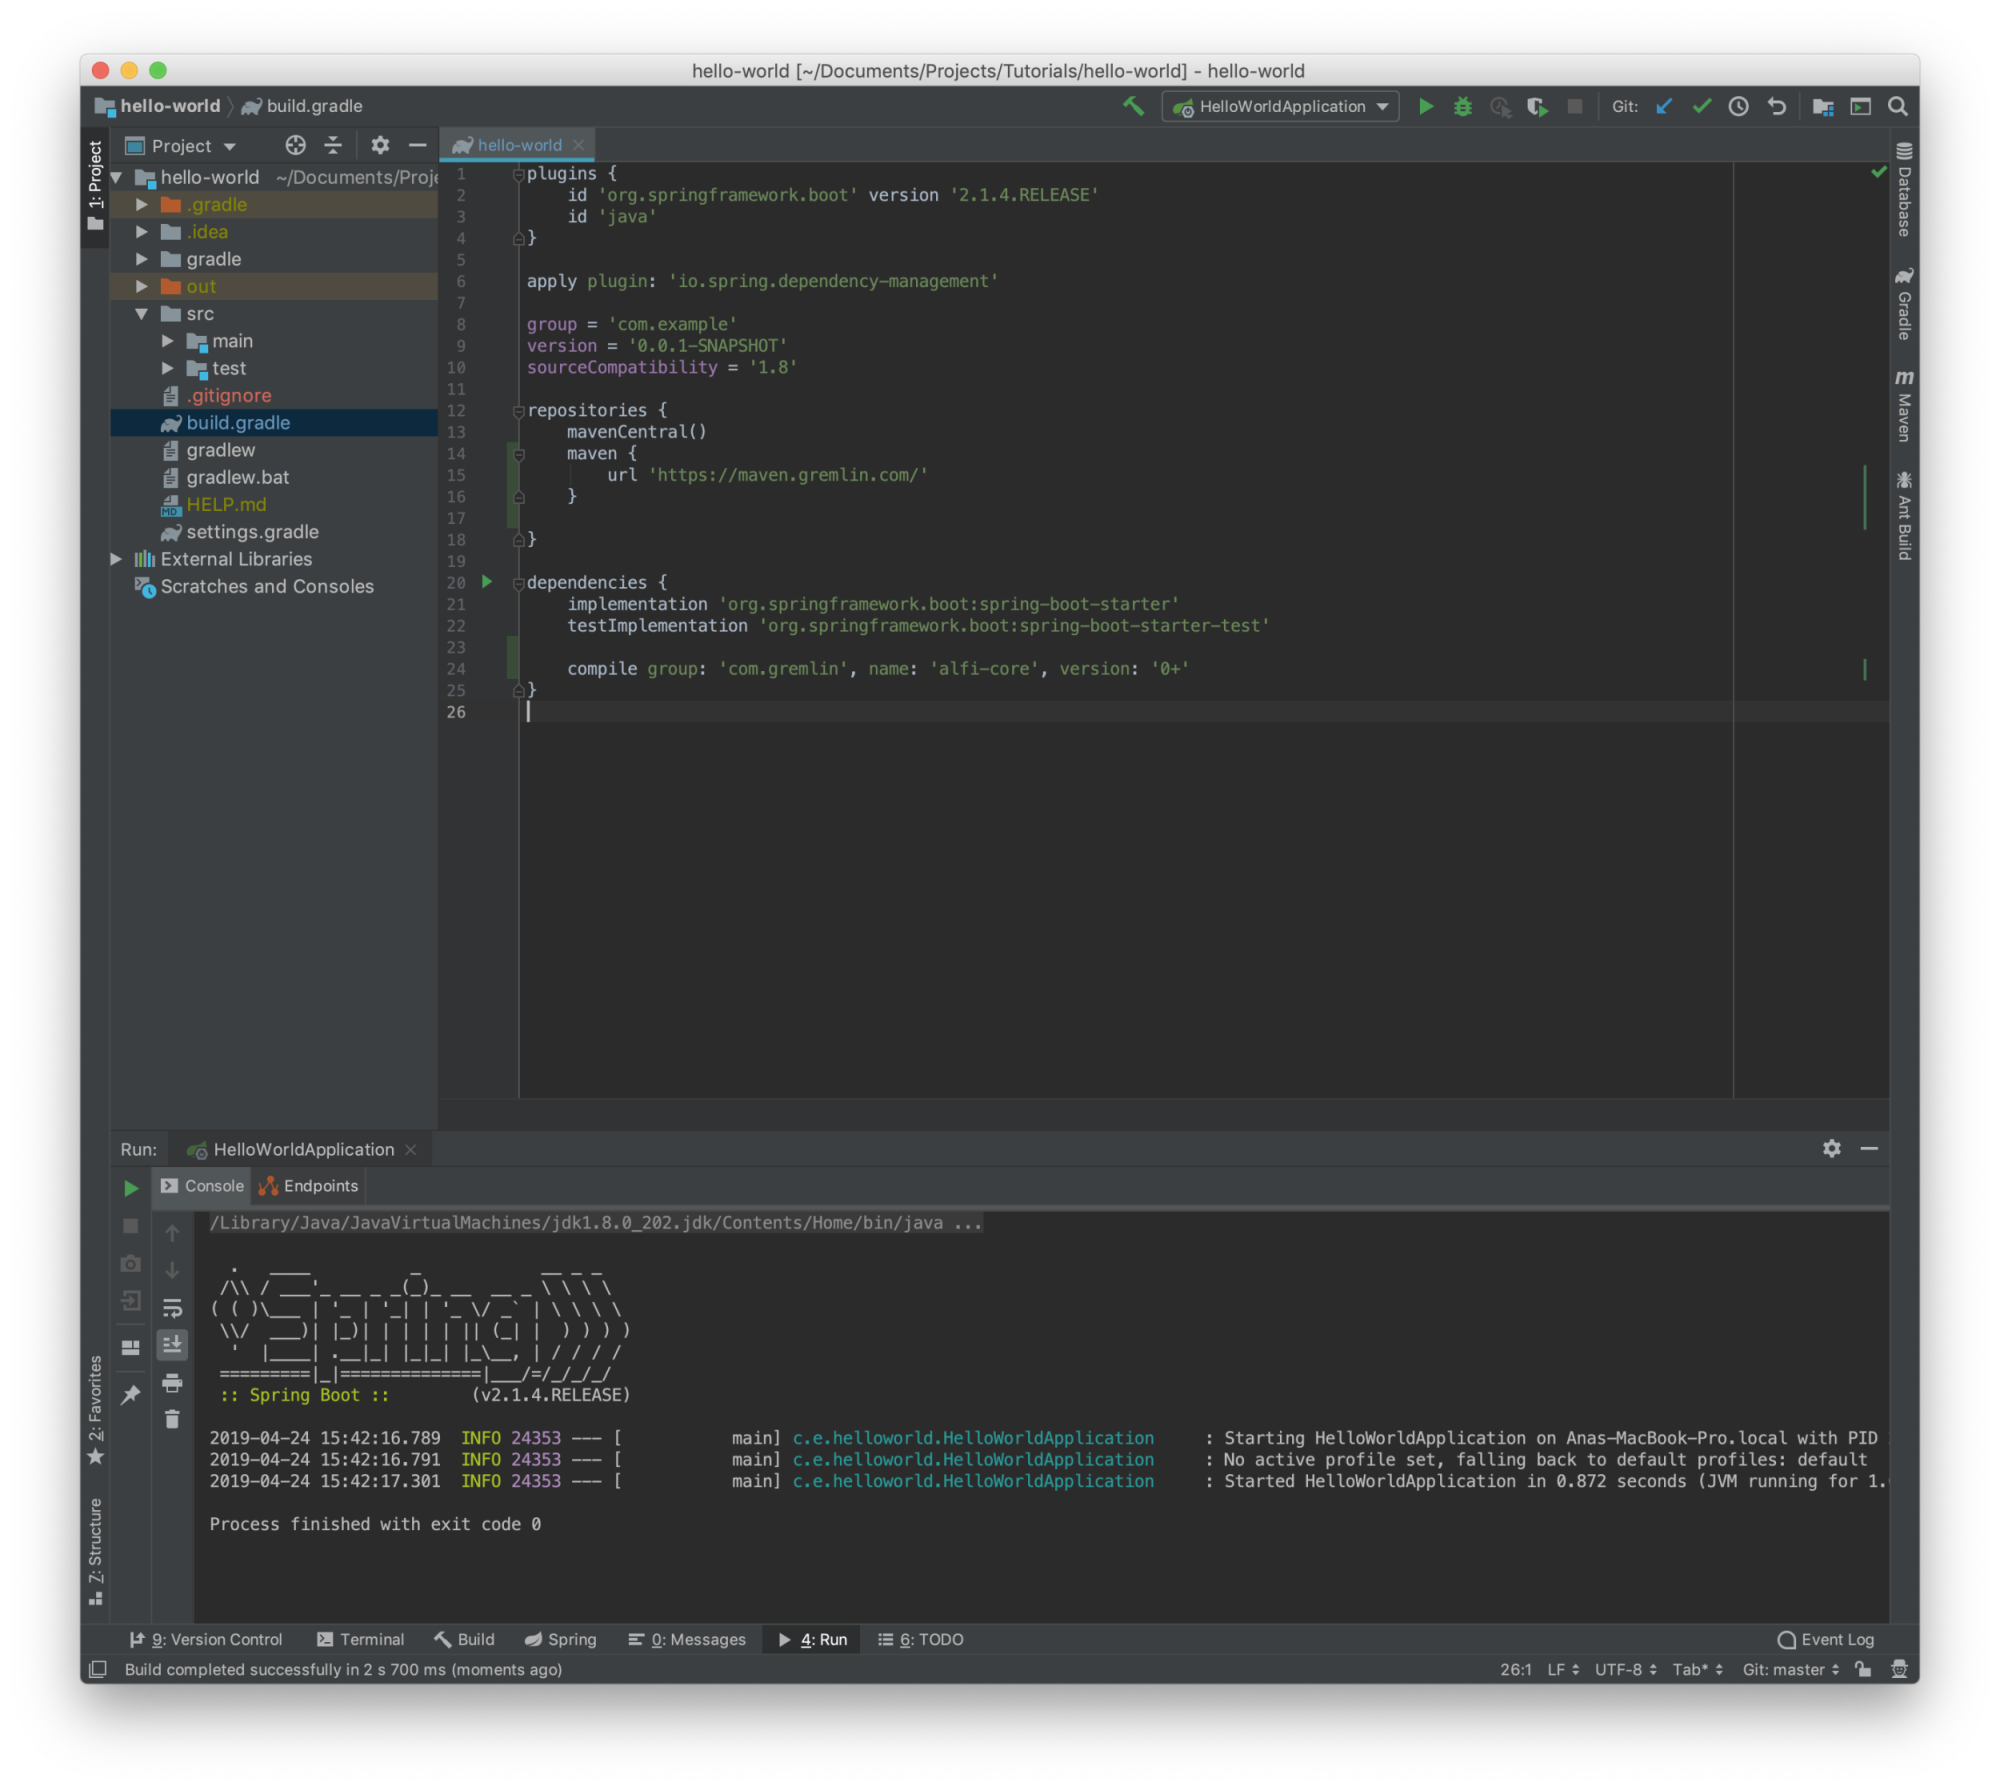
Your build.gradle file should appear as below:

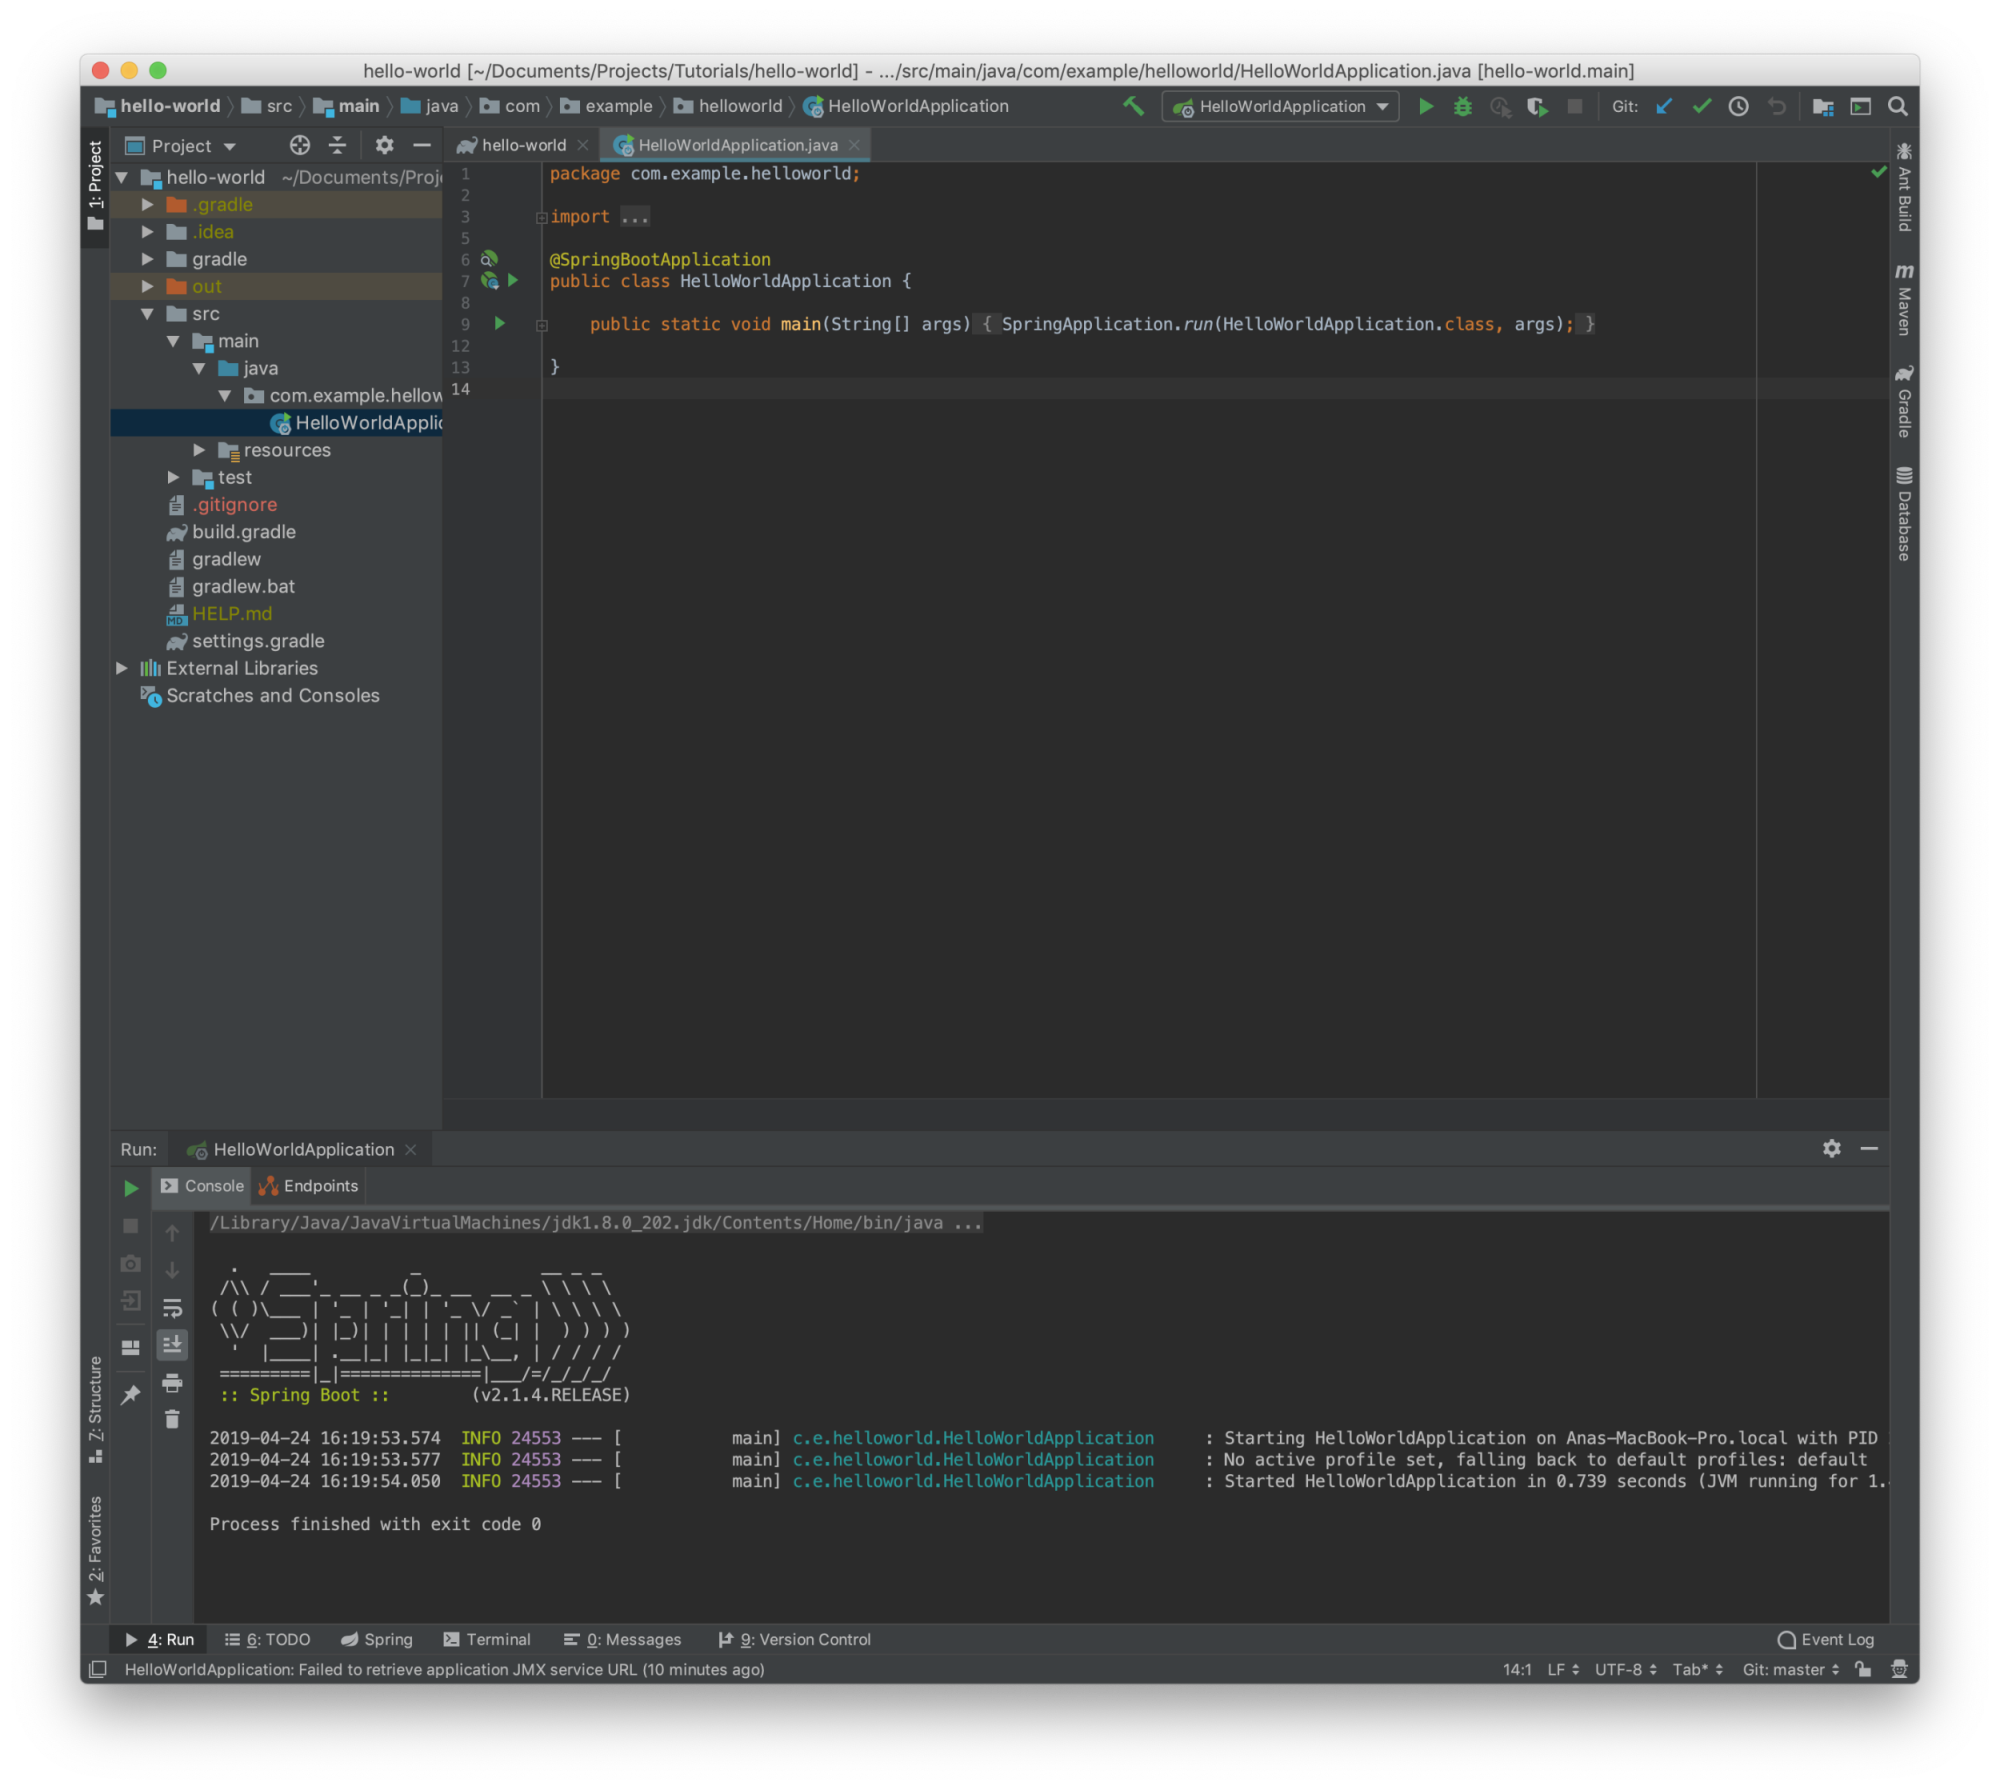
To make sure everything is compiling properly, let’s build and run this Java Application.
Going back to the IDE we will go over to ‘Run” and run select HelloWorldApplication.

We want to see the project compile and the console to display this:
There are various ways to set up your authorization credentials to use ALFI, for this example, we will be setting up environment credentials using the IDE, they include:
| Key | Value |
|---|---|
GREMLIN_ALFI_IDENTIFIER | A unique identifier for the application. This will be used to distinguish all of the application instances from one another |
GREMLIN_TEAM_ID | The Team ID that this application belongs to. Only users in that team may conduct attacks on it. |
GREMLIN_TEAM_CERTIFICATE_OR_FILE | Certificate for authenticating to Gremlin. See below for syntax on permissible values. |
GREMLIN_PRIVATE_KEY_OR_FILE | Private Key for authenticating to Gremlin. See below for syntax on permissible values. |
GREMLIN_PRIVATE_KEY_OR_FILE | If set to anything other than true, all functionality is turned off. This is designed to give you the ability to safely deploy ALFI, knowing you've got a simple off-switch. When the functionality is off, no failures are ever injected by ALFI, no calls are made to the API, and no logging past configuration-time occurs. |
Going back to our IDE we will go over to ‘Run”, select “Edit Configuration”. Another window will open up. Press “Environment” to show more options, and then press the icon inside the text box for “Environment variables”.
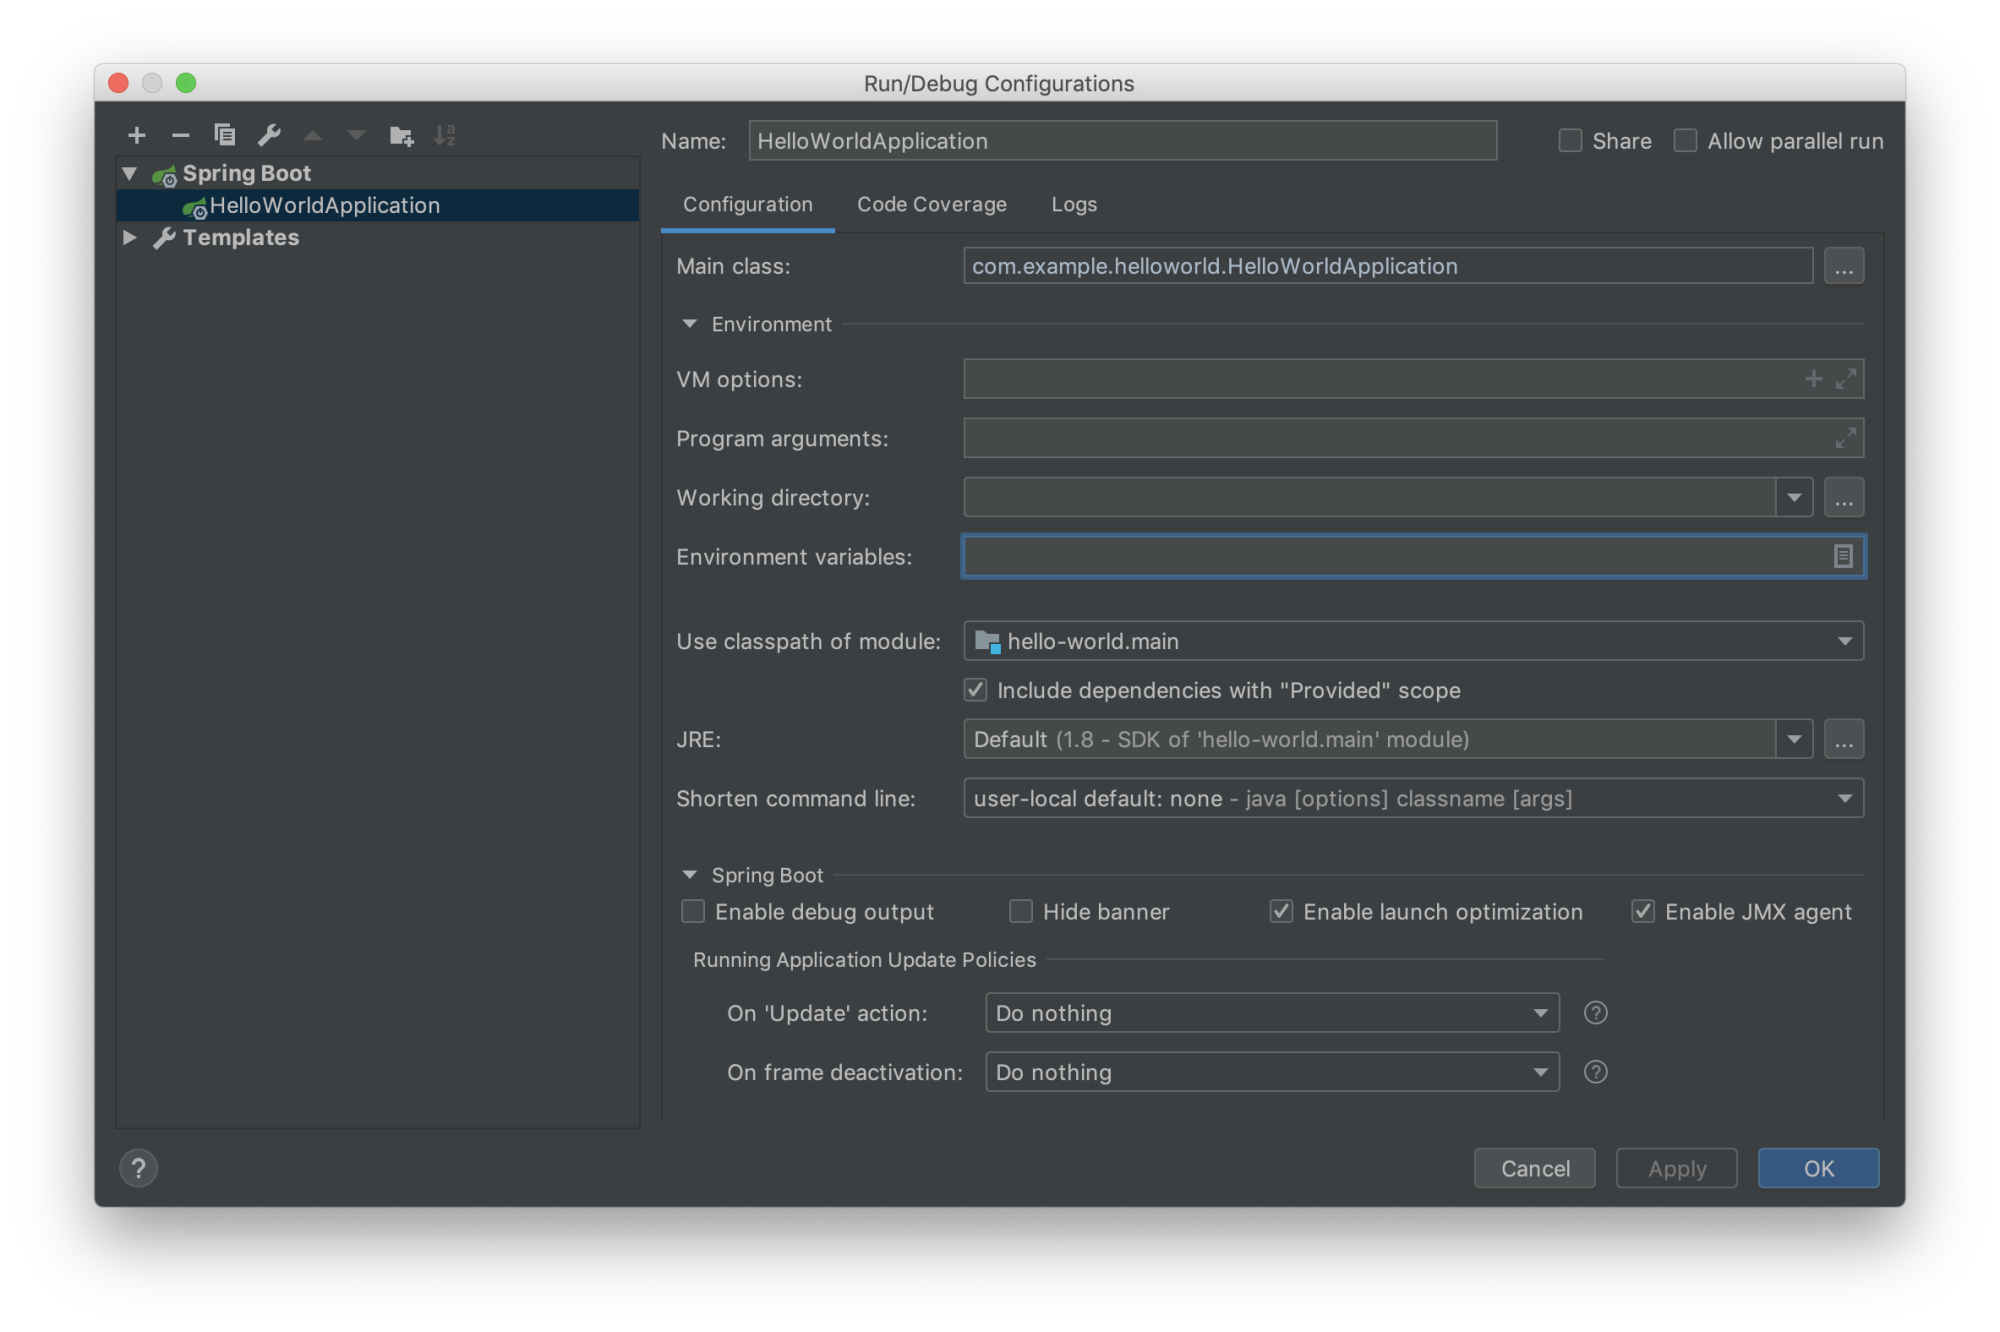
Another window will display, We will now set up the environment variables we need for everything to run.
First, we need to add GREMLIN_ALFI_IDENTIFIER. This is a unique identifier for the application. This will be used to distinguish all of the application instances from one another.
Next, we will add GREMLIN_TEAM_ID. This can be found by logging in to the Gremlin App using your Company name and sign-on credentials. (These were emailed to you when you signed up to start using Gremlin.) Click on the right corner circular avatar, selecting “Company Settings”, followed by selecting the Team. The ID you’re looking for is found under Configuration as “Team ID”.
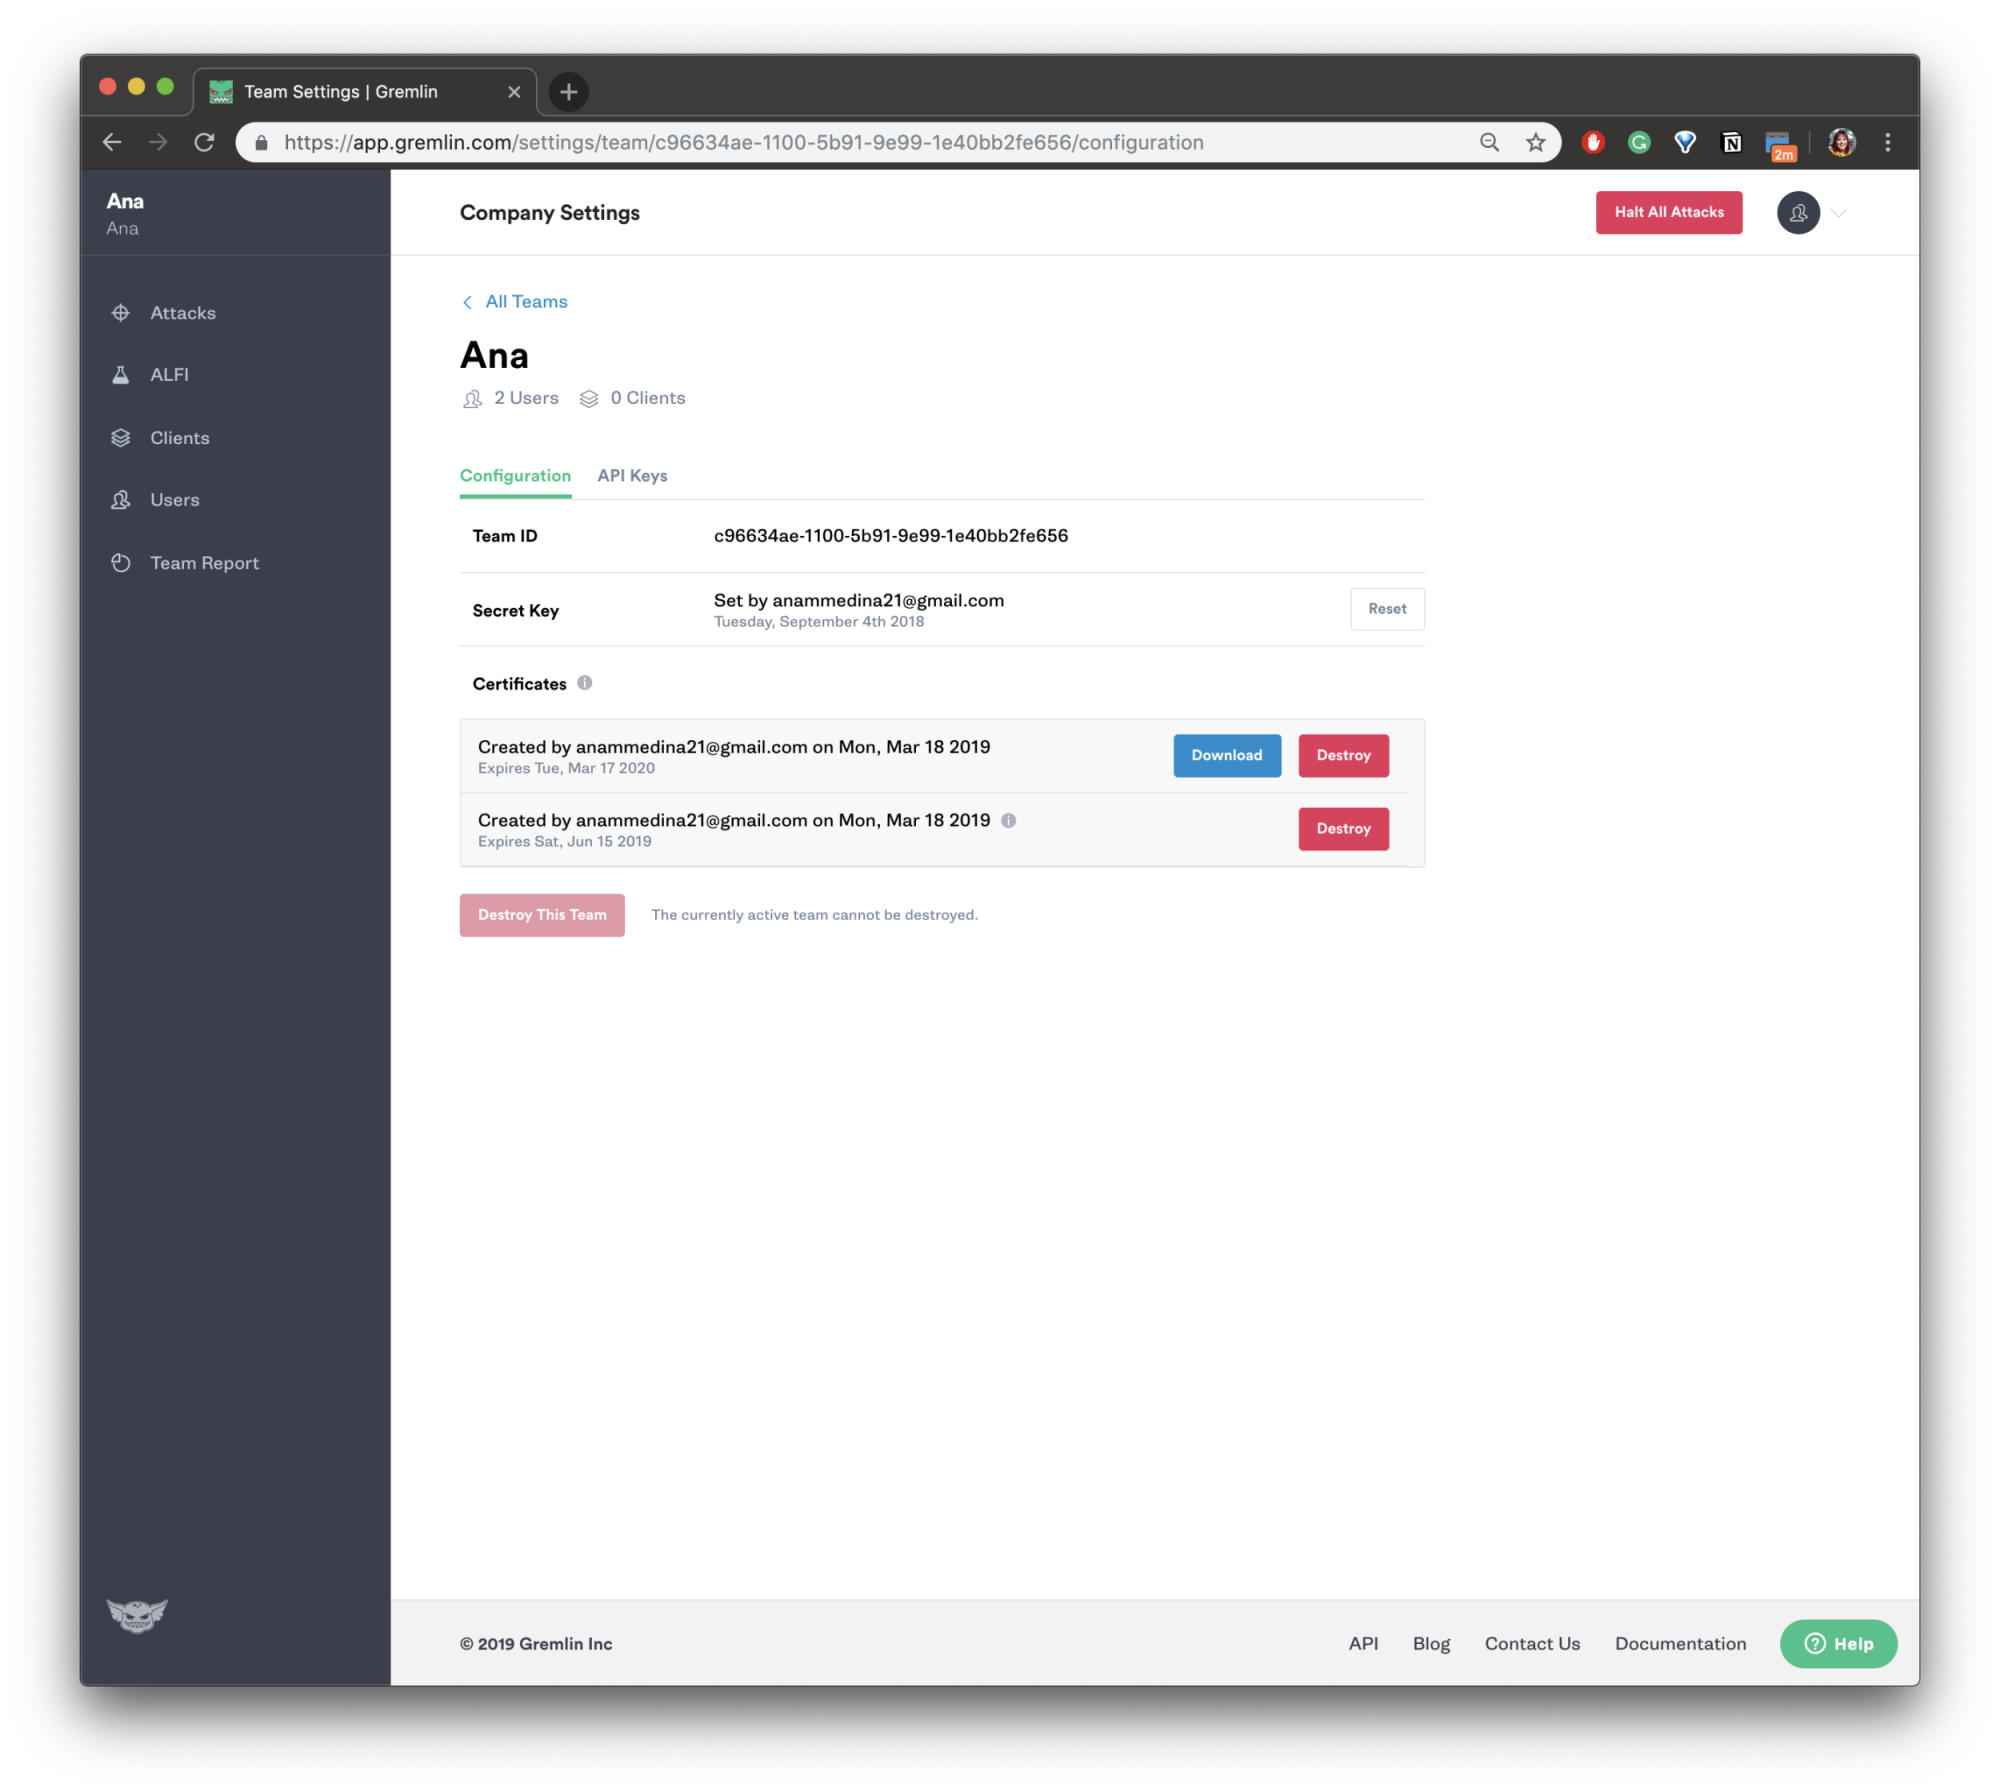
For the next two environment variables, GREMLIN_TEAM_CERTIFICATE_OR_FILE, and GREMLIN_TEAM_PRIVATE_KEY_OR_FILE, we first need to go back to the Gremlin UI we see above. Click the blue Download button to download your certificates to your local computer. The downloaded certificate.zip contains both a public-key certificate and a matching private key. You will need to unzip them, and place them somewhere you can reference, for this tutorial we will be unzipping them on our desktop. Now we can add them as environment variables by passing on their file location, like this:
1GREMLIN_TEAM_CERTIFICATE_OR_FILE=file:///Users/anamedina/Desktop/certificate/cert.pem
1GREMLIN_TEAM_PRIVATE_KEY_OR_FILE=file:///Users/anamedina/Desktop/certificate/priv.pem
For the last environment variable, GREMLIN_ALFI_ENABLED, we will set it to true. If set to anything other than true, all functionality is turned off.
1GREMLIN_ALFI_ENABLED=true
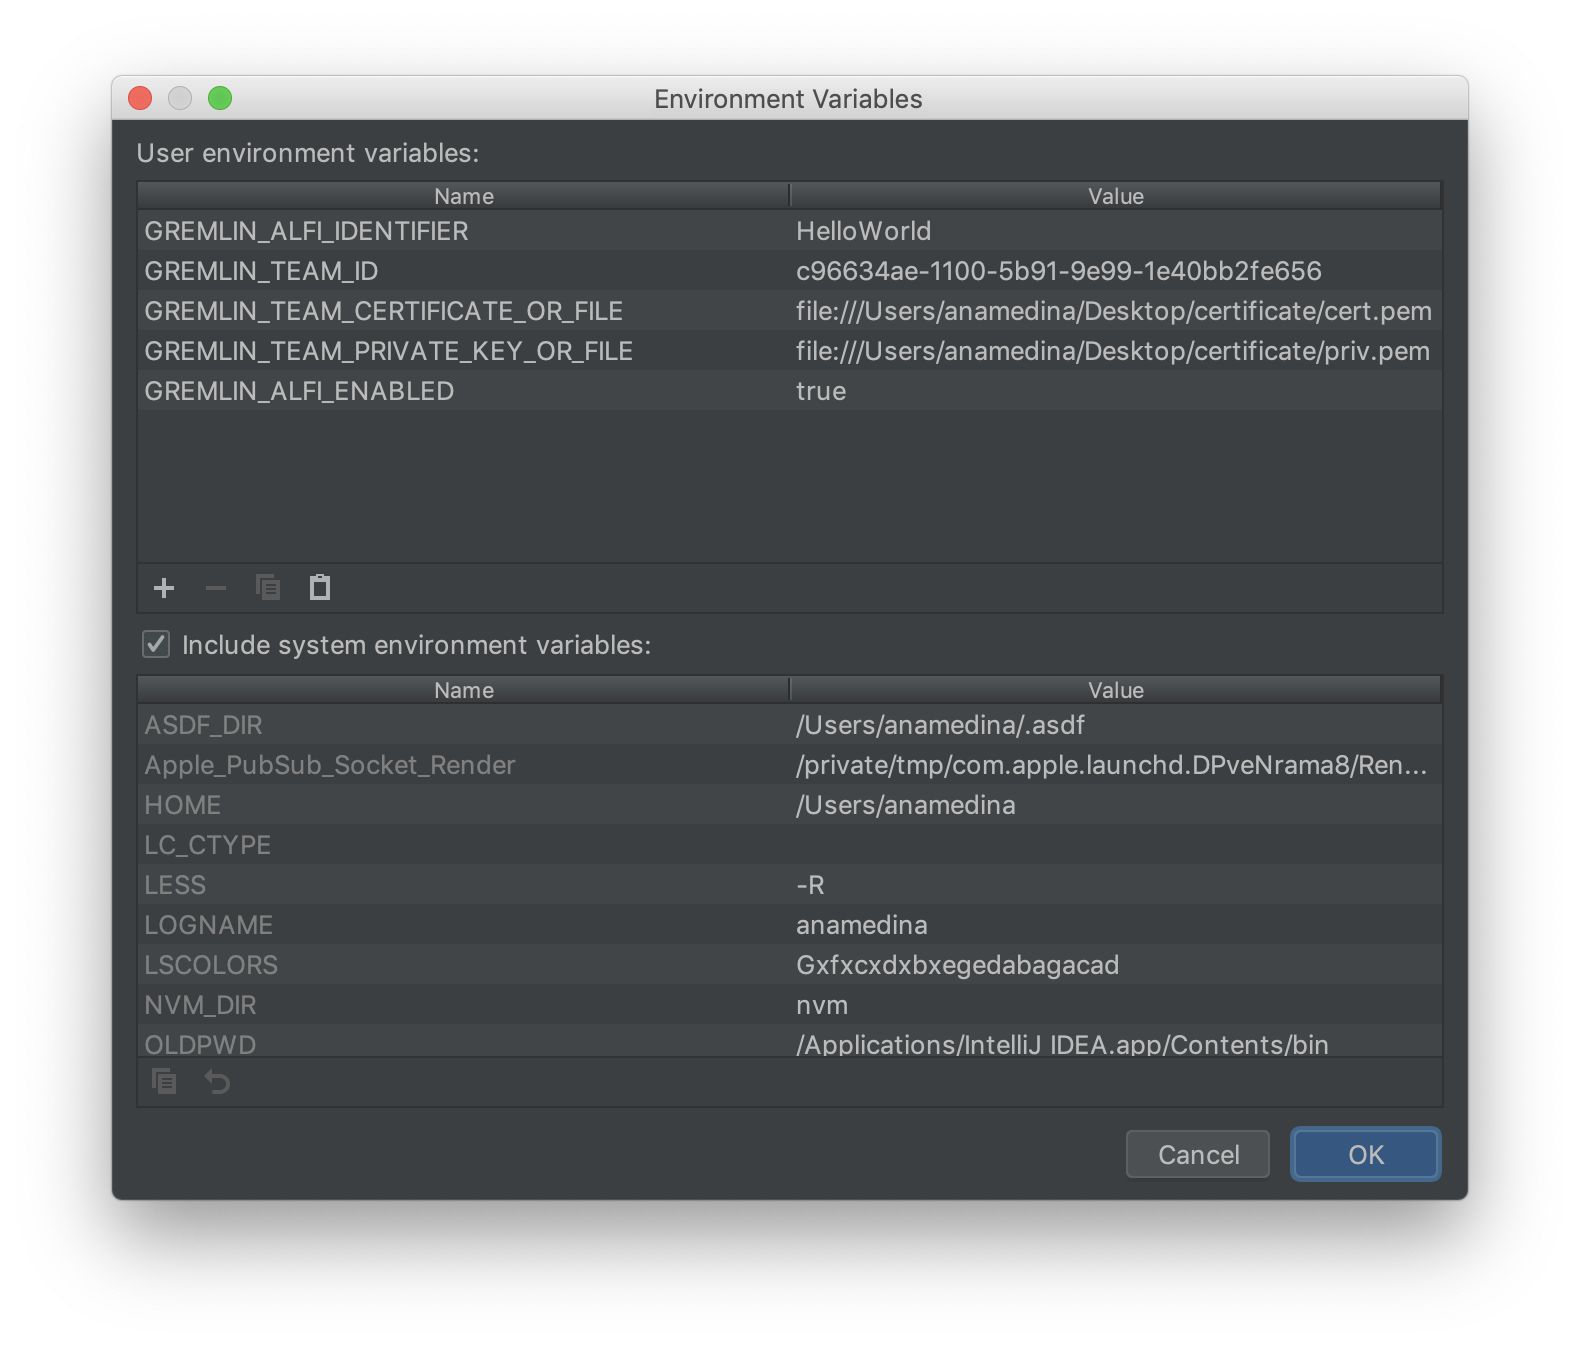
This is the example of my environment variables:
1GREMLIN_ALFI_IDENTIFIER=HelloWorld2GREMLIN_TEAM_ID=c96634ae-1100-5b91-9e99-1e40bb2fe6563GREMLIN_TEAM_CERTIFICATE_OR_FILE=file:///Users/anamedina/Desktop/certificate/cert.pem4GREMLIN_TEAM_PRIVATE_KEY_OR_FILE=file:///Users/anamedina/Desktop/certificate/priv.pem5GREMLIN_ALFI_ENABLED=true
After inputting the values, press “OK” on the environment variables window, Followed by “Apply” and “OK” on the Configuration window to save the changes.
Let’s dive into the code. On the left navigator bar of the IDE, select the HelloWorldApplication file, which can be found under src/main/java/com.example.helloworld. It should look like this:
Now we can start by importing the classes we need at the top of the file. We can do this by pressing the ... and showing the rest of the code. We will add the import needed for ALFI under the other imports by adding:
1import com.gremlin.*;
Now, under public static void main(String[] args) {
1SpringApplication.run(HelloWorldApplication.class, args);
We will create our own attributes using GremlinCoordinatesProvider that takes the ApplicationCoordinates of types and fields,
1final GremlinCoordinatesProvider coordinatesProvider = new GremlinCoordinatesProvider() {}
This function ends up looking a bit like the one below, for this example, we have to make sure to use @Override as part of the function as we want to provide specific ApplicationCoordinates rather than infer from the environment.
1final GremlinCoordinatesProvider coordinatesProvider = new GremlinCoordinatesProvider() {@Overridepublic ApplicationCoordinates initializeApplicationCoordinates() {return new ApplicationCoordinates.Builder().withType("HelloWorldExample").withField("name", "ana-medina").build();}};
Then, we will create an instance of GremlinServiceFactory of this class and get GremlinService from it. We will also use the coordinatesProvider we just created to pass on to GremlinServiceFactory.
1final GremlinServiceFactory gremlinServiceFactory = new GremlinServiceFactory(coordinatesProvider);final GremlinService gremlinService = gremlinServiceFactory.getGremlinService();
To be able to target individual requests within an application and be able to be more specific and refine your Chaos Engineering experiment, we now configure the custom TrafficCoordinates of it.
1final TrafficCoordinates injectionPoint = new TrafficCoordinates.Builder().withType("main").withField("name", "medina").build();gremlinService.applyImpact(injectionPoint);
Your build.gradle should look something like this
1plugins {id 'org.springframework.boot' version '2.1.4.RELEASE'id 'java'}apply plugin: 'io.spring.dependency-management'group = 'com.example'version = '0.0.1-SNAPSHOT'sourceCompatibility = '1.8'repositories {mavenCentral()maven {url 'https://maven.gremlin.com/'}}dependencies {implementation 'org.springframework.boot:spring-boot-starter'testImplementation 'org.springframework.boot:spring-boot-starter-test'compile group: 'com.gremlin', name: 'alfi-core', version: '0+'}
Your HelloWorldApplication.java should look something like this
1package com.example.helloworld;import org.springframework.boot.SpringApplication;import org.springframework.boot.autoconfigure.SpringBootApplication;import com.gremlin.*;@SpringBootApplicationpublic class HelloWorldApplication {public static void main(String[] args) {final GremlinCoordinatesProvider coordinatesProvider = new GremlinCoordinatesProvider() {@Overridepublic ApplicationCoordinates initializeApplicationCoordinates() {return new ApplicationCoordinates.Builder().withType("HelloWorldExample").withField("name", "ana-medina").build();}};final GremlinServiceFactory gremlinServiceFactory = new GremlinServiceFactory(coordinatesProvider);final GremlinService gremlinService = gremlinServiceFactory.getGremlinService();final TrafficCoordinates injectionPoint = new TrafficCoordinates.Builder().withType("main").withField("name", "medina").build();gremlinService.applyImpact(injectionPoint);}}
To make sure everything is running properly, let’s build and run this Java Application.
Going back to the IDE we will go over to ‘Run” and run HelloWorldApplication.

You want to read the output that displays on the and look for these confirmations that your setup is ready:
1com.gremlin.SystemGremlinConfigurationResolver - Gremlin ALFI found full config set in environment variablescom.gremlin.SystemGremlinConfigurationResolver - Gremlin is using configuration from environment variablescom.gremlin.AlfiConfigFromCertificateAndPrivateKey - Gremlin ALFI is using certificate located at : file:///Users/anamedina/Desktop/certificate/cert.pemcom.gremlin.AlfiConfigFromCertificateAndPrivateKey - Gremlin ALFI is using private key located at : file:///Users/anamedina/Desktop/certificate/priv.pemcom.gremlin.GremlinConfigurationResolver - Gremlin ALFI found certificate and private keycom.gremlin.GremlinServiceFactory - Gremlin enabled for Team c96634ae-1100-5b91-9e99-1e40bb2fe656com.gremlin.GremlinServiceFactory - Application Coordinates found Coordinates{type=HelloWorldExample, fields={name=ana-medina}}com.gremlin.i - Registered Gremlin Client named HelloWorldcom.gremlin.i - Received Gremlin API Experiments(0) in main, took 439 mscom.gremlin.GremlinService - Matching on Traffic Coordinates: Coordinates{type=main, fields={name=medina}}com.gremlin.GremlinService - No Gremlin impact for : Coordinates{type=main, fields={name=medina}}
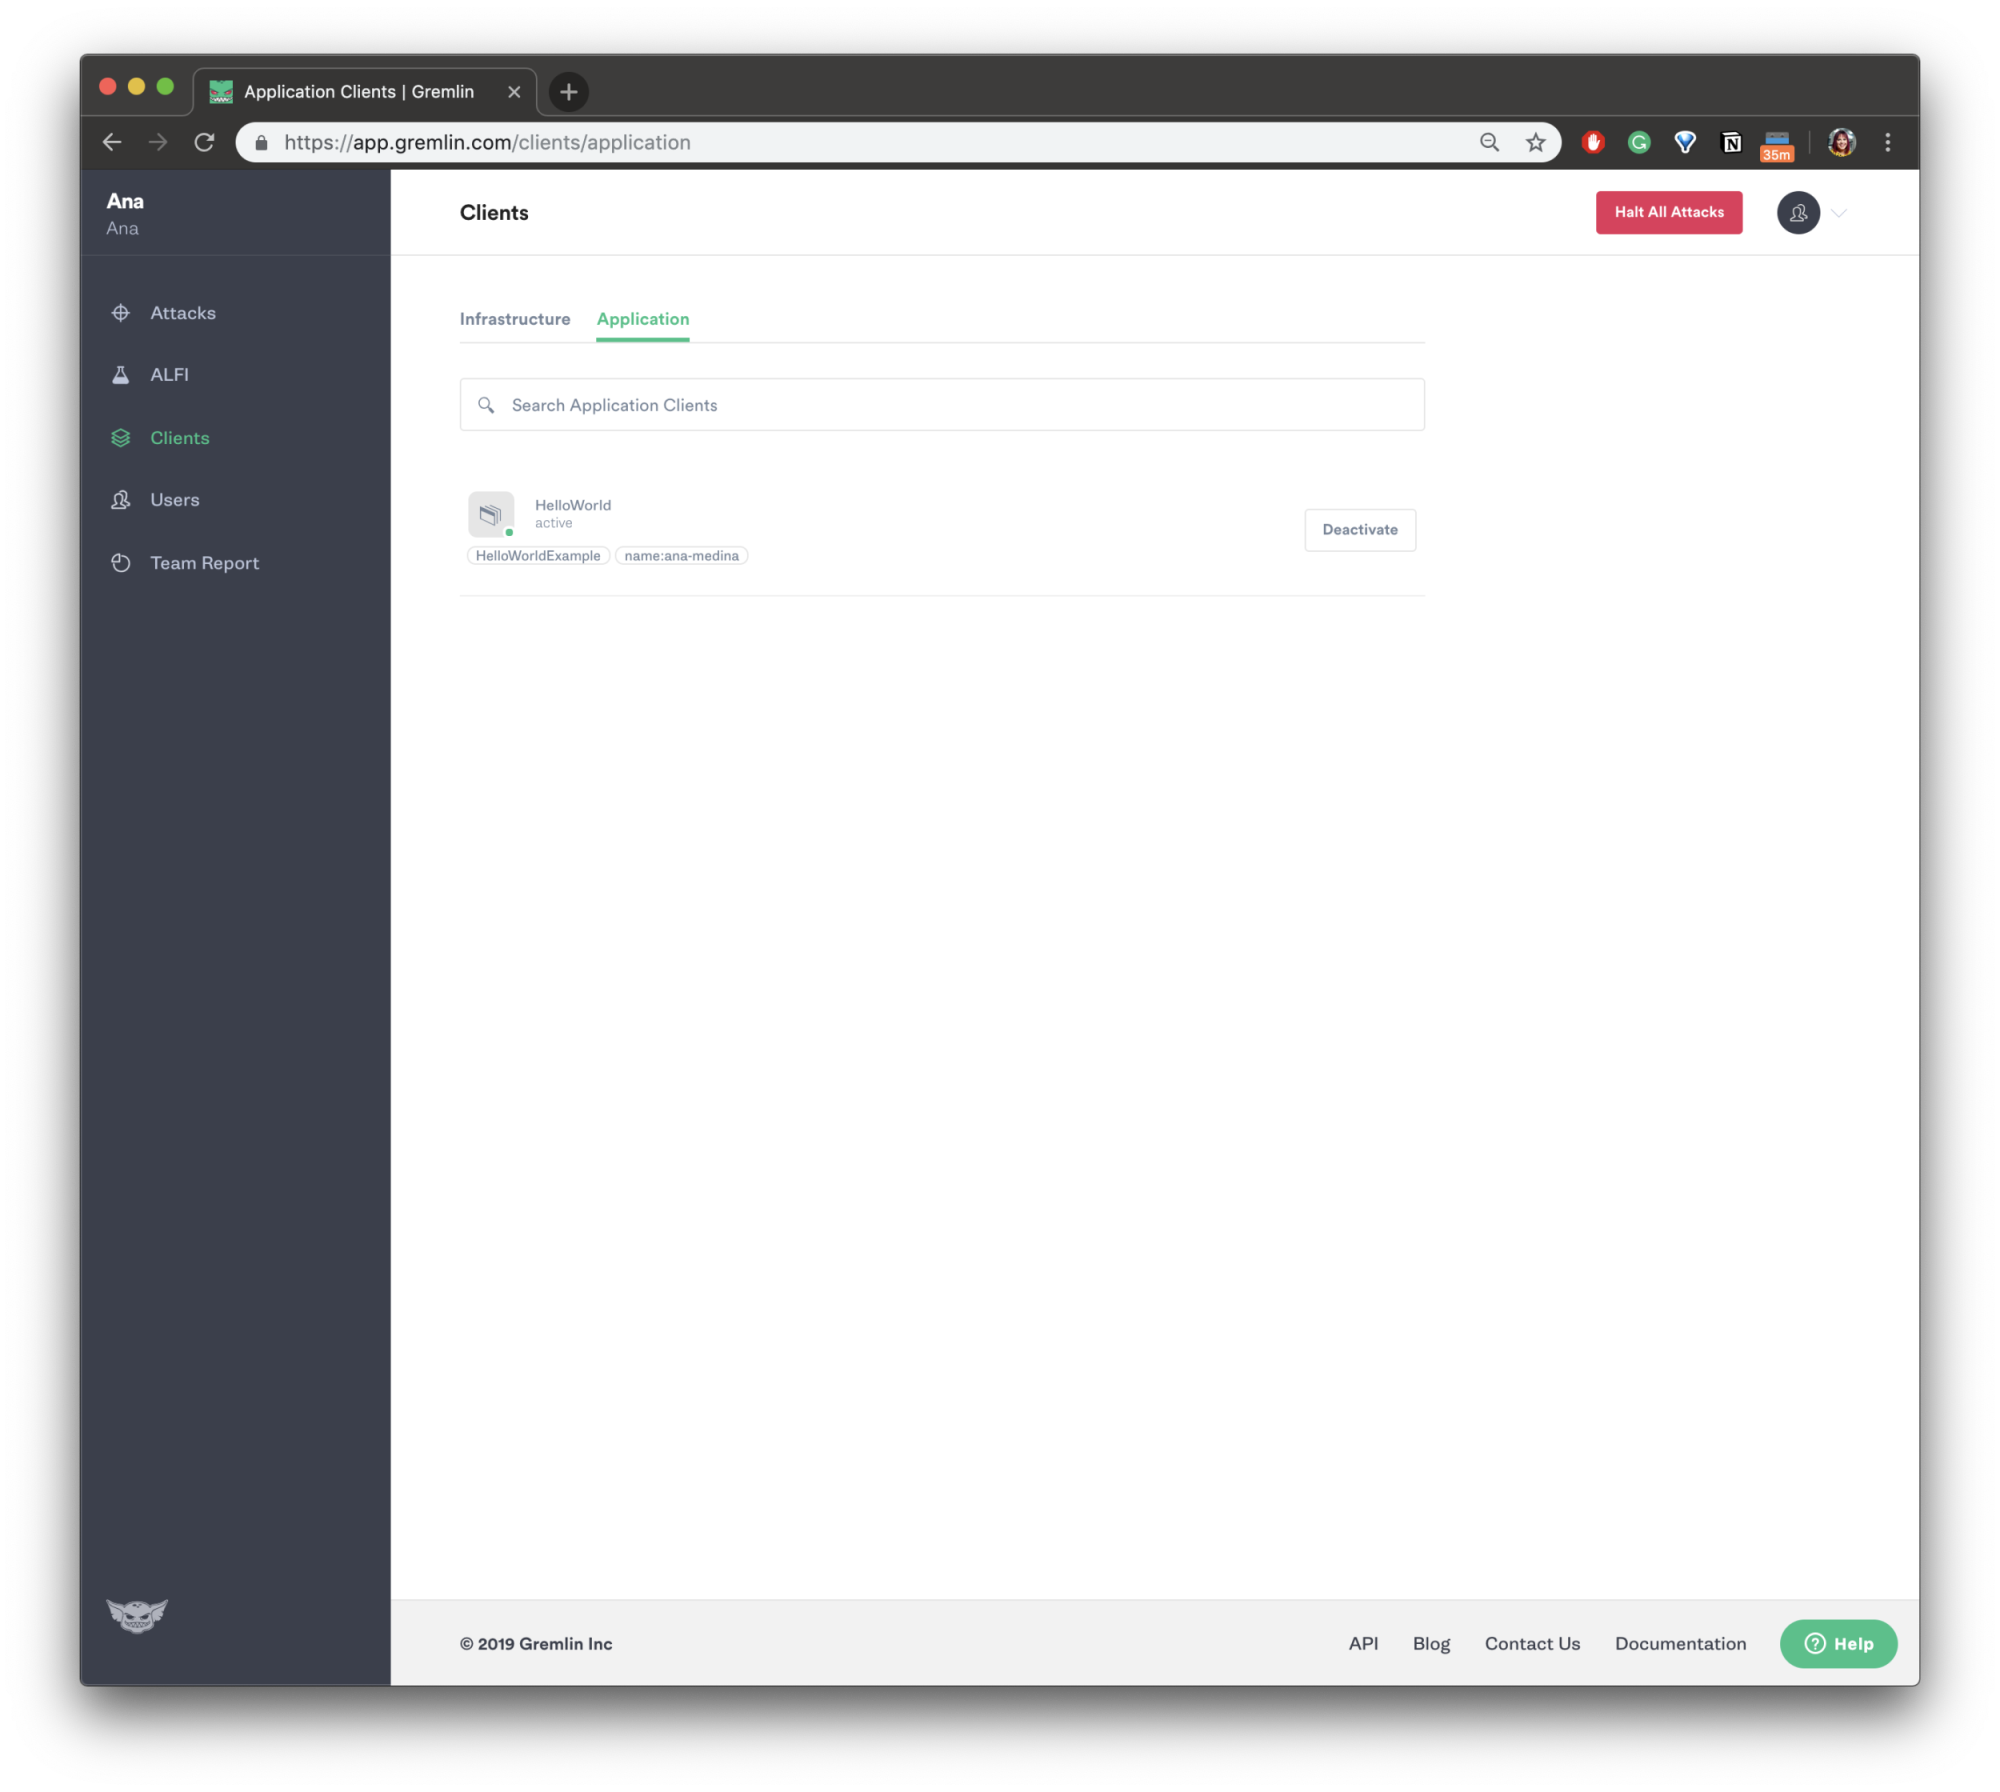
Now we will use the Gremlin Web App, on the left navigation bar, select Clients and click on Application, your ALFI client should appear similar to the one below:
Using the Gremlin Web app, on the left navigation bar select “ALFI”, and then “New ALFI Attack” The variables you defined via code in Step 6 and Step 8 are going to be used when you create your ALFI Attack.
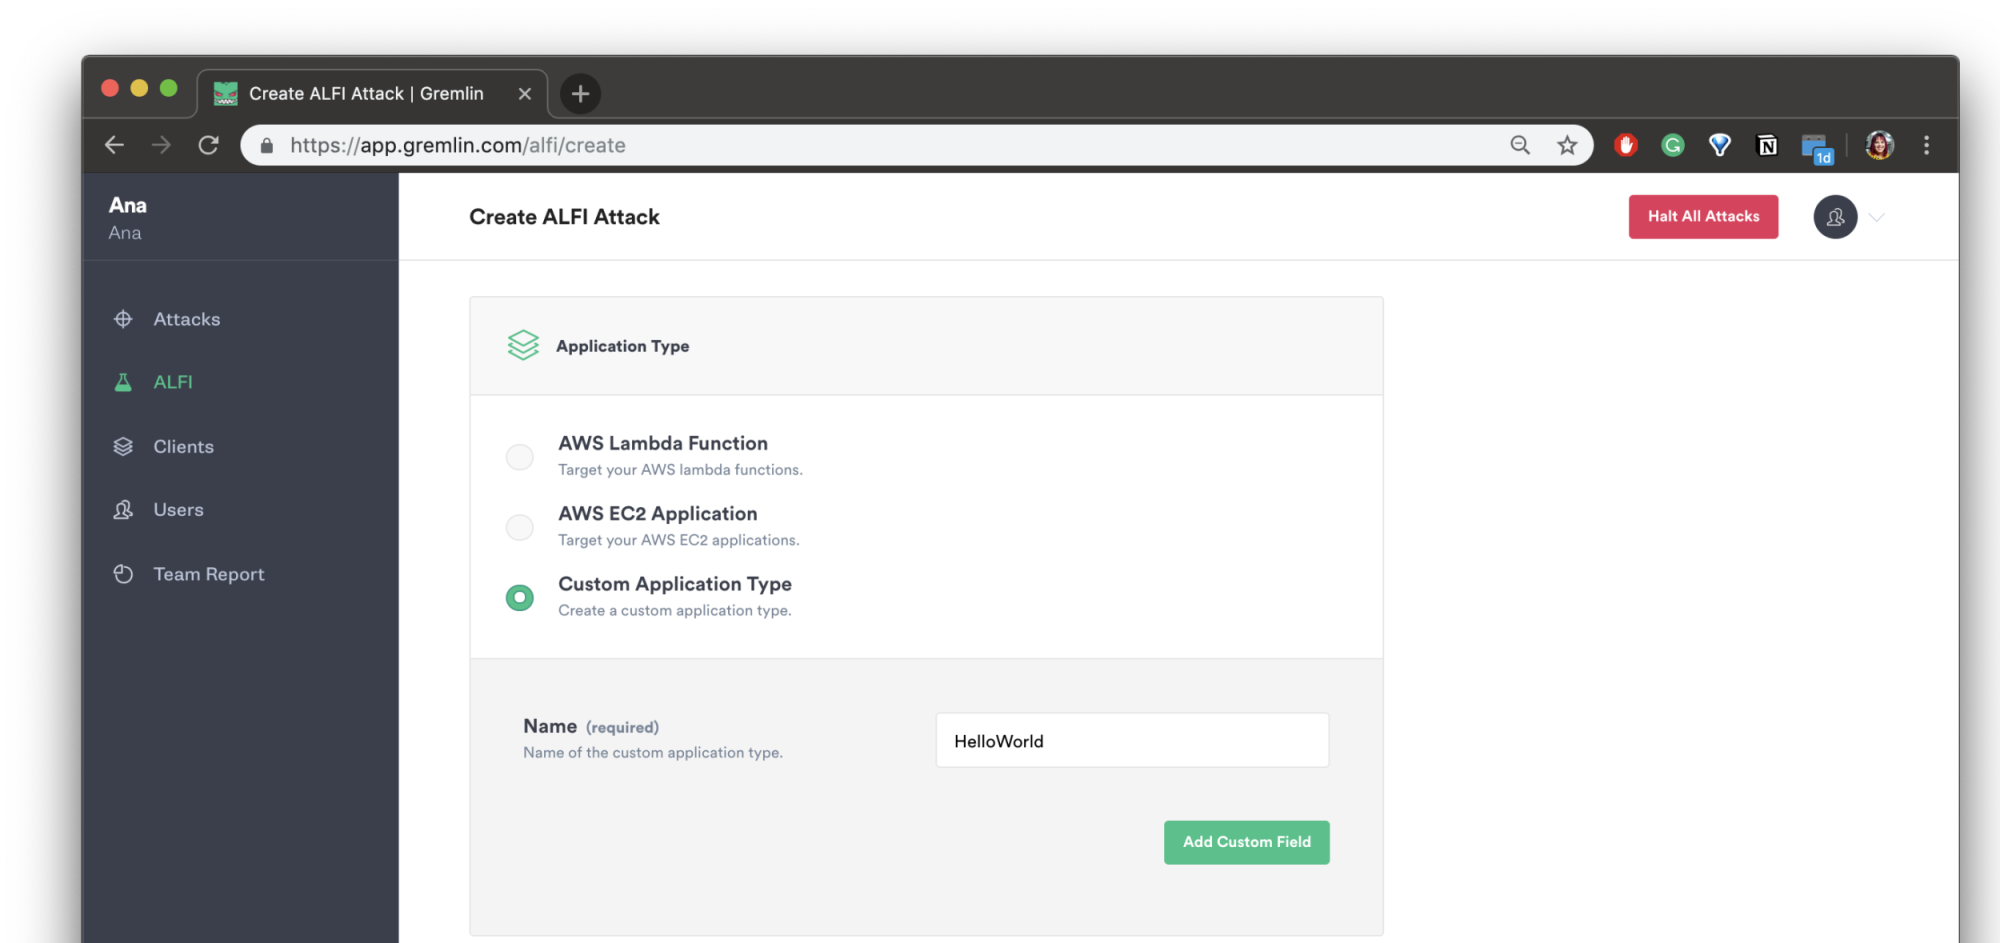
We will start by selecting “Custom Application Type”, and pass on the Name we defined, which is HelloWorldExample.
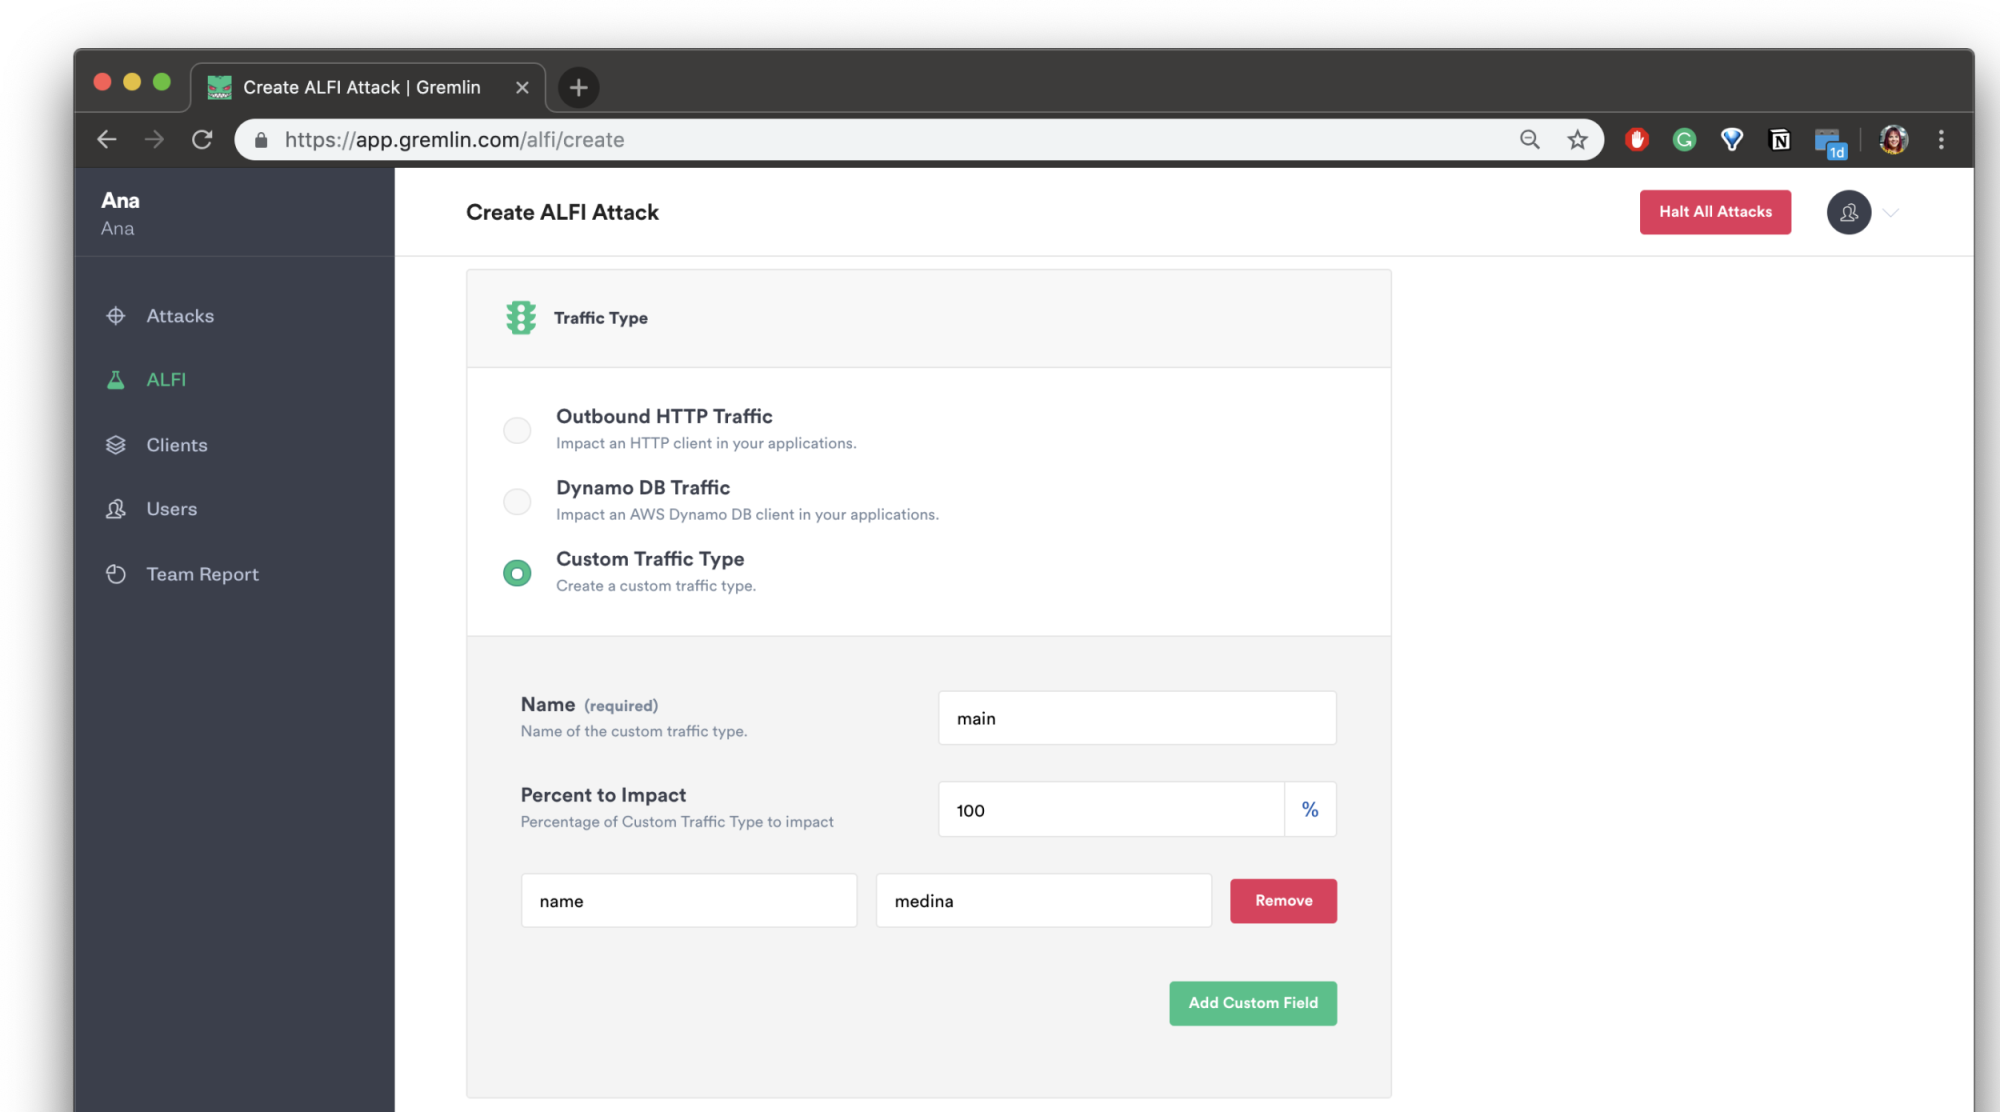
Then under Traffic Type, we will be selecting “Custom Traffic Type” and passing on the name of main. we will also be choosing to impact 100% of Traffic. Now we have to press the “Add Custom Field” button and create a Custom Field Name of name, while passing “medina”.
We want to inject 300ms of latency on to the main function, and also run this for 600 seconds (10 minutes). We also want to turn on the flag for ALFI to throw an exception so we can easily identify where the failure injection happened.
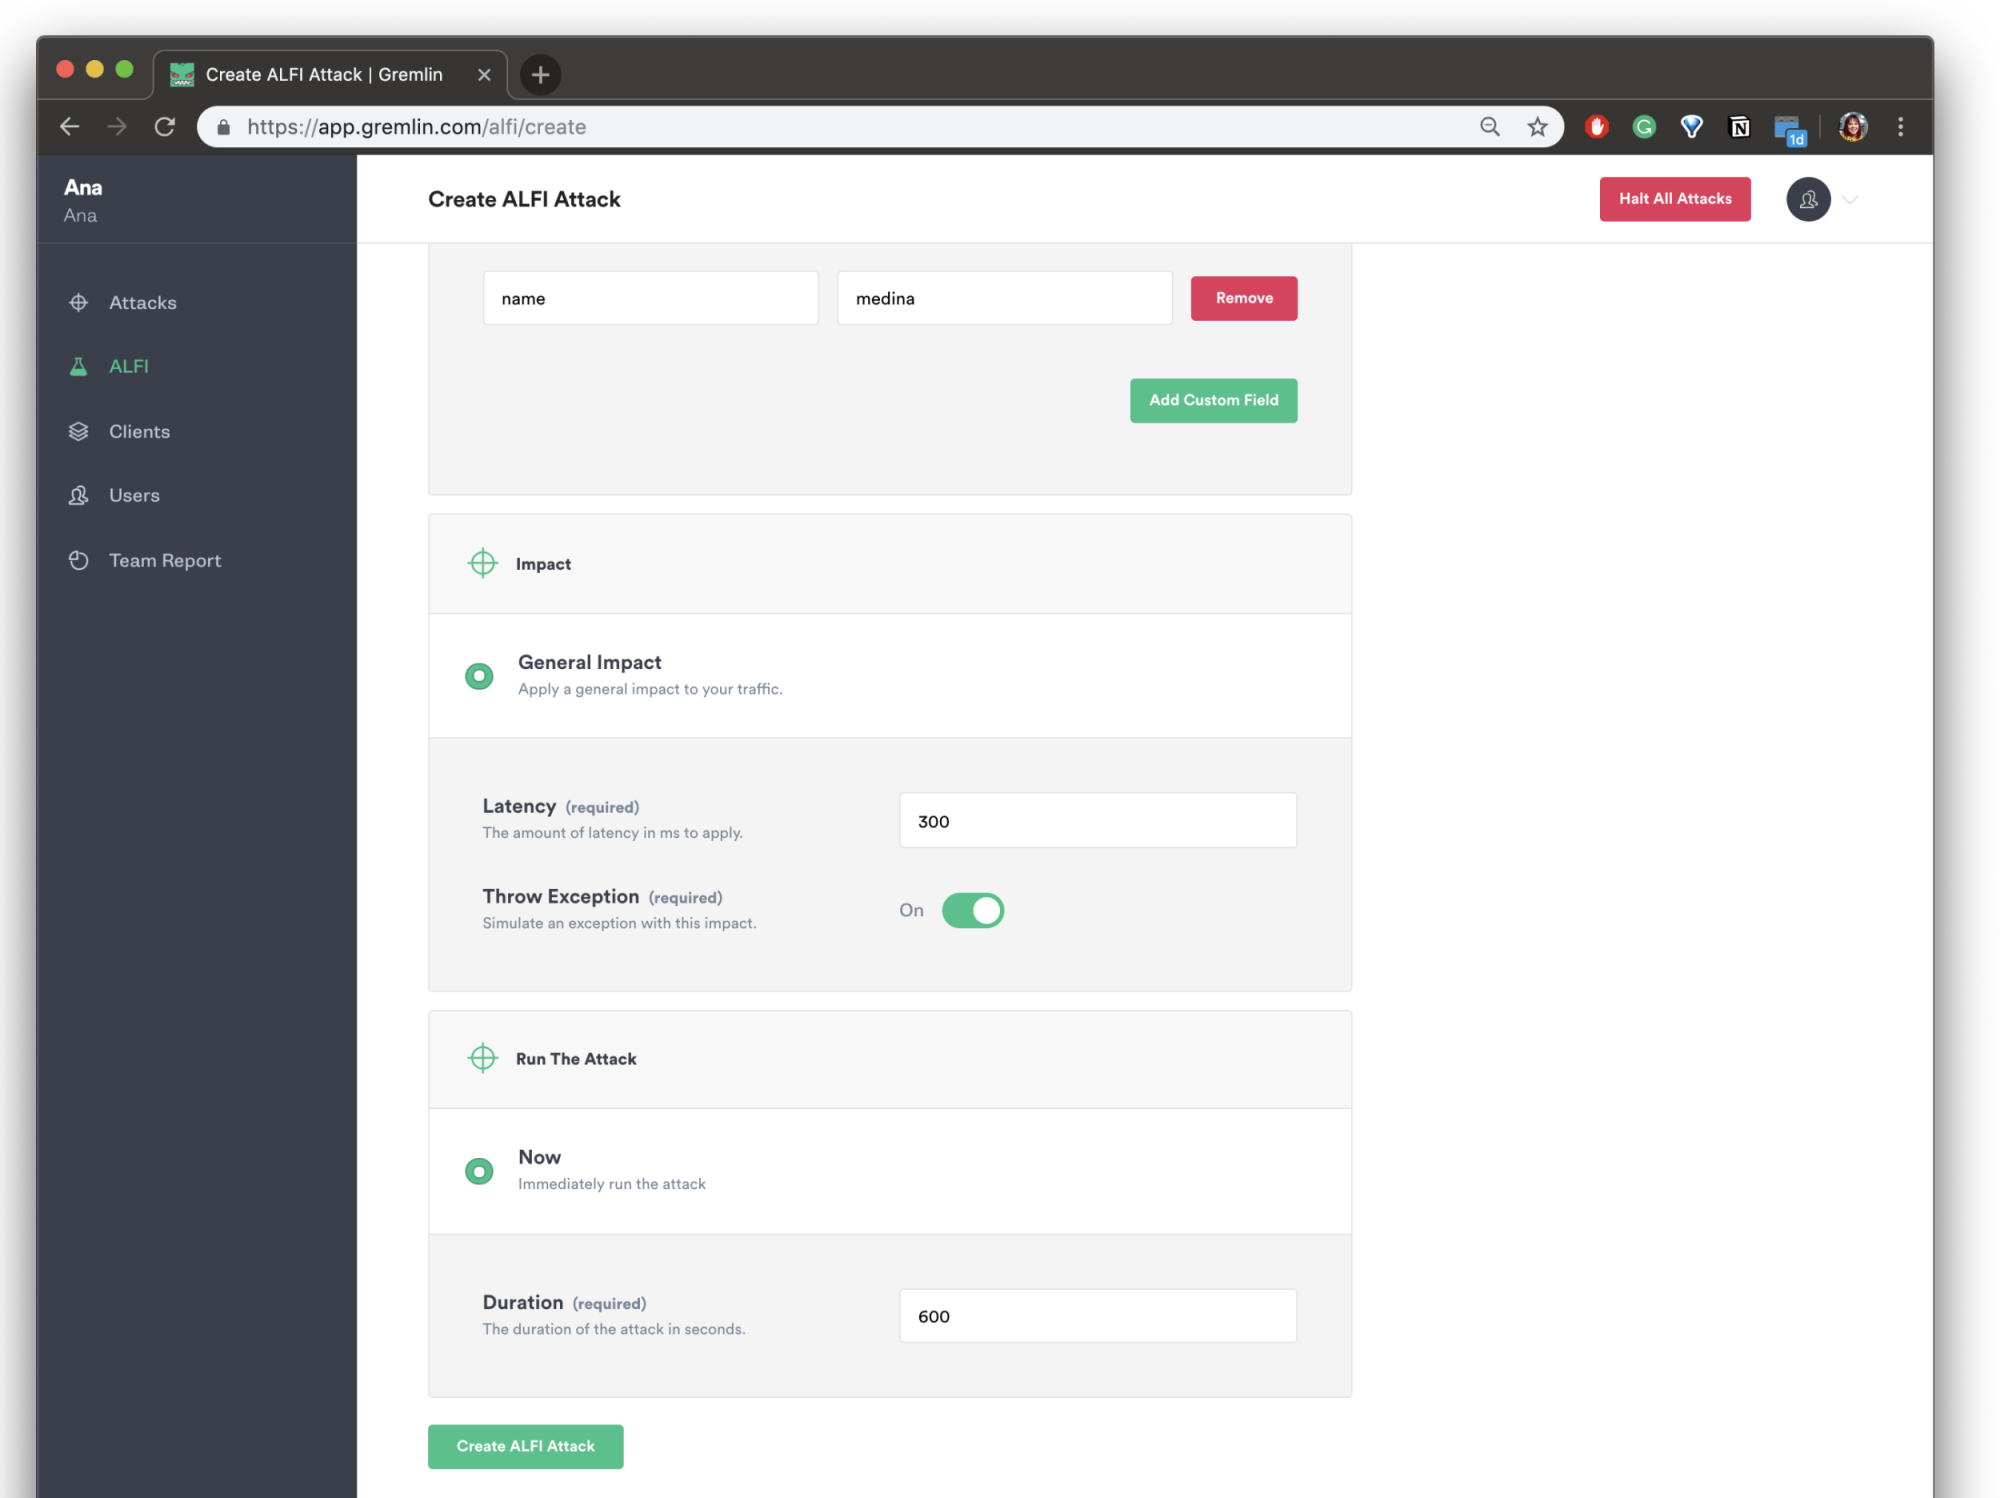
After, extending the duration and double checking all your variables, feel free to press the “Create the ALFI Attack” and unleash the gremlin.
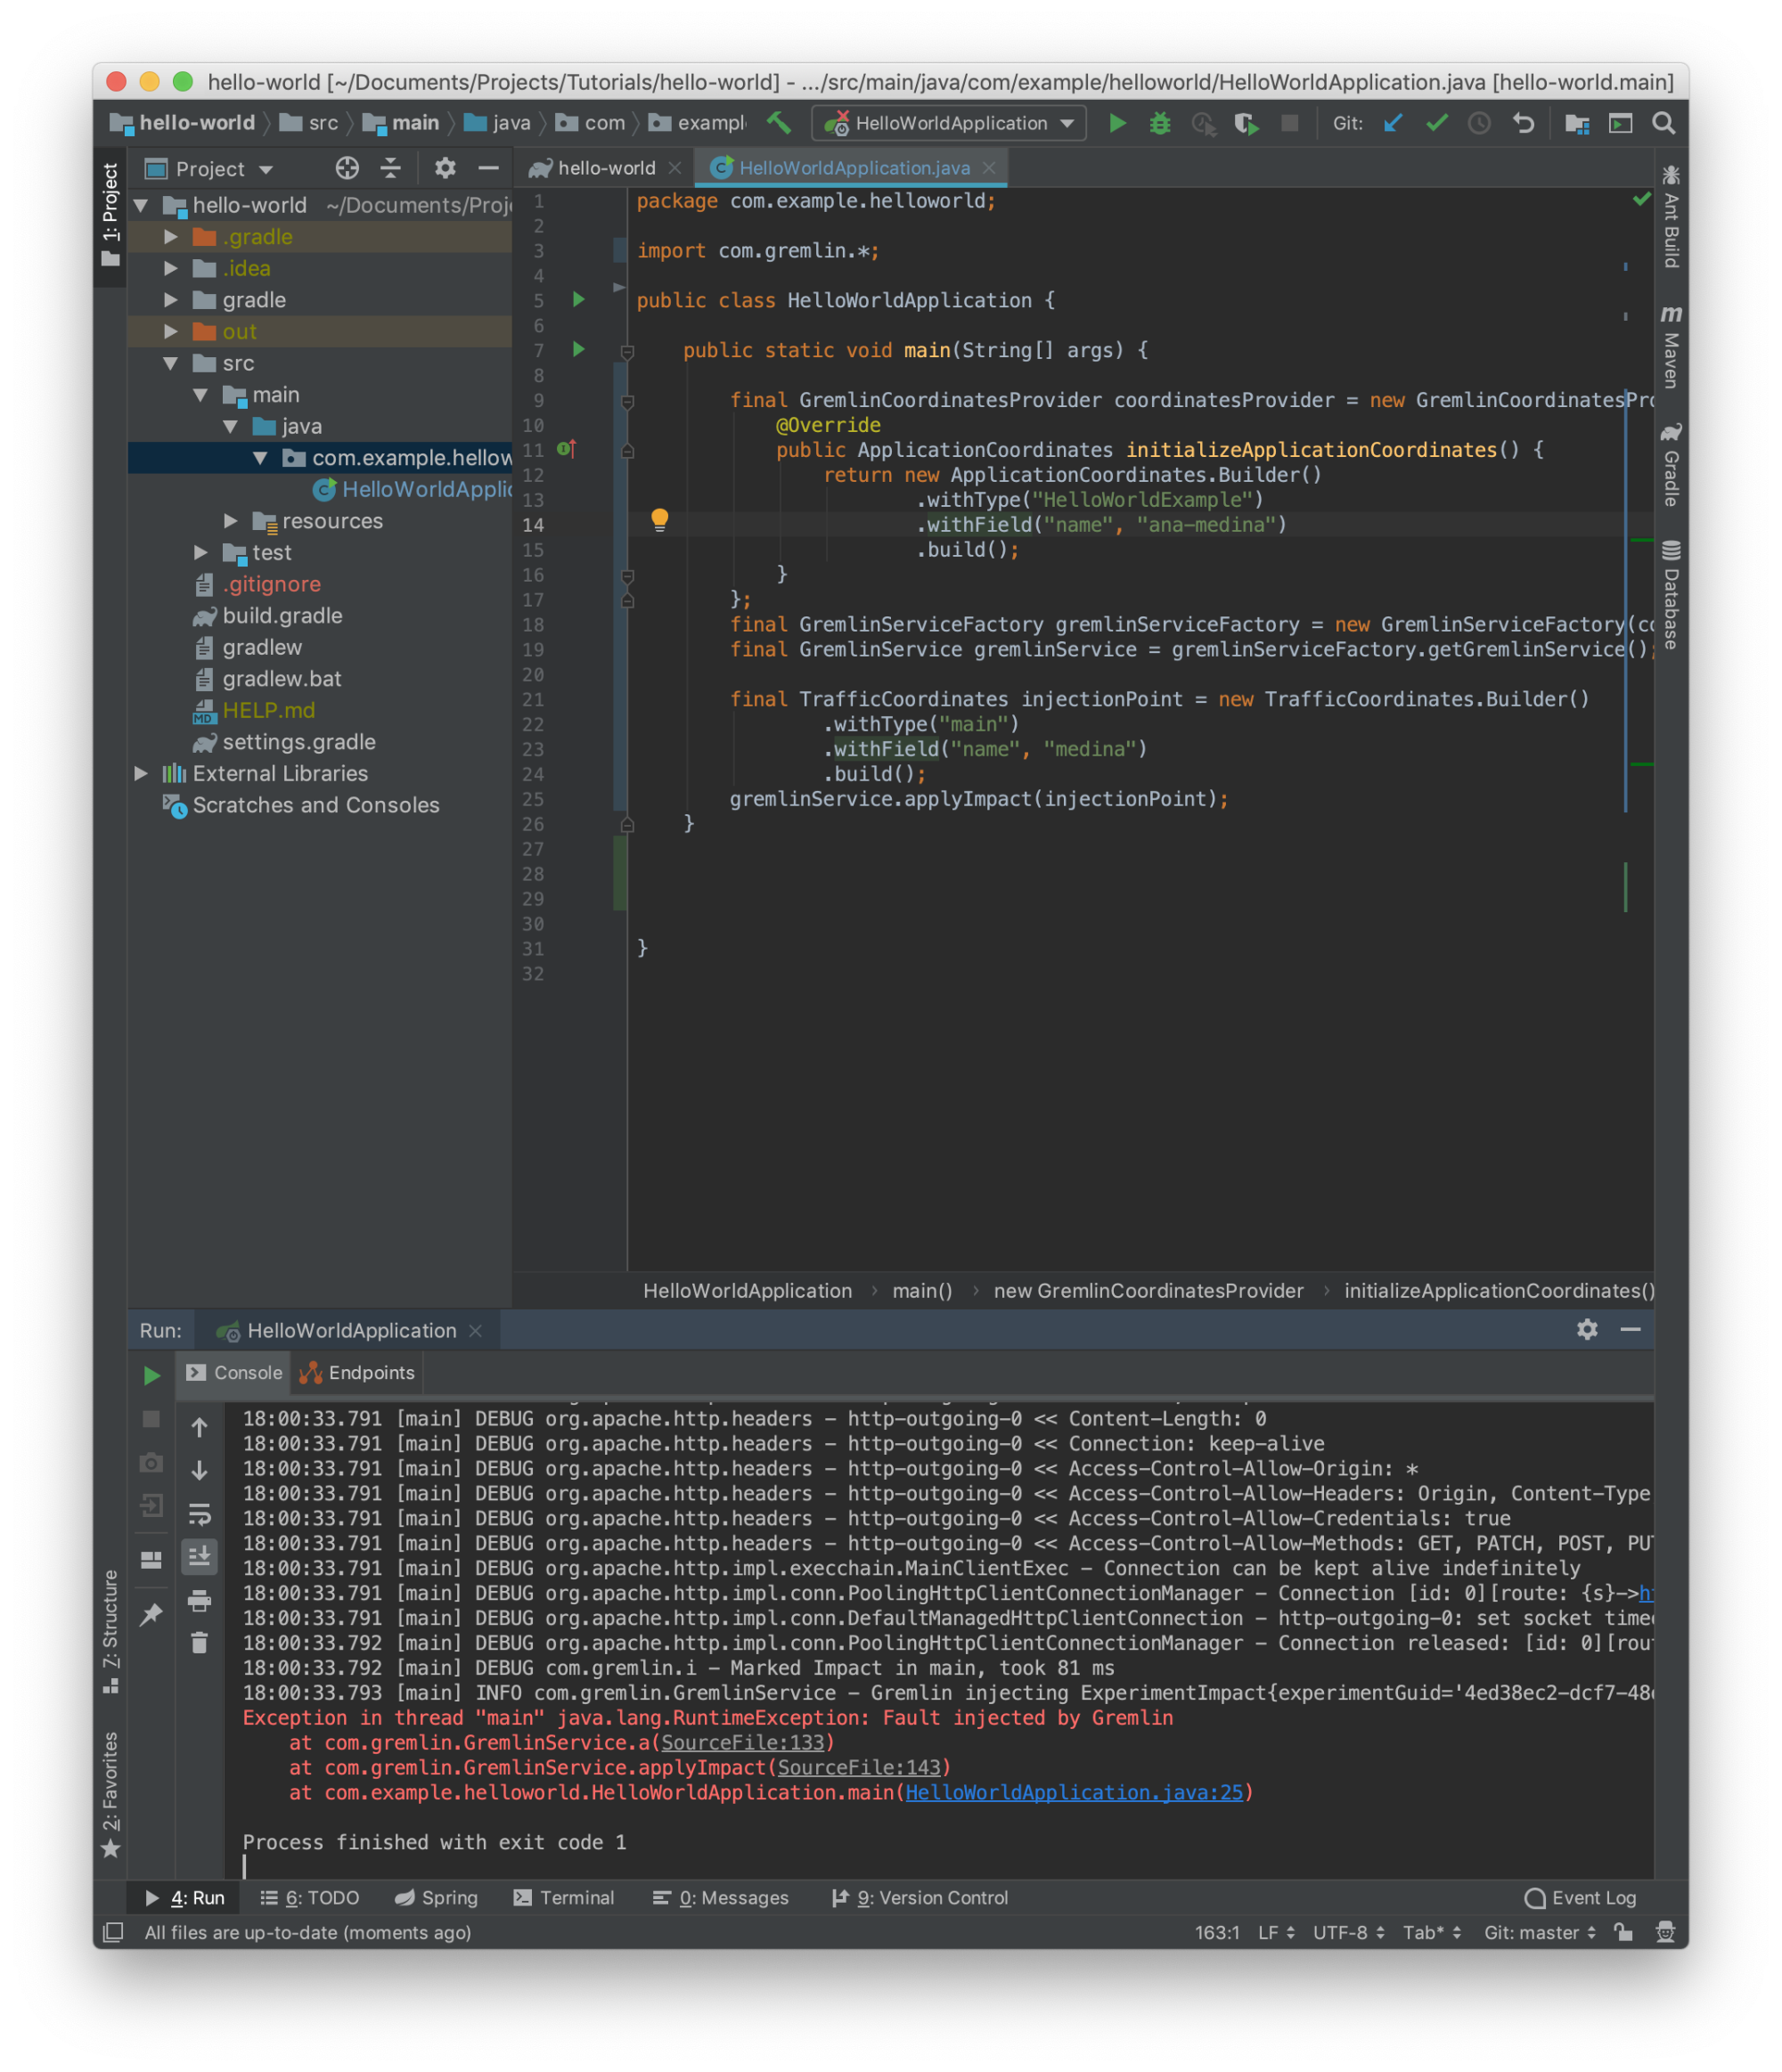
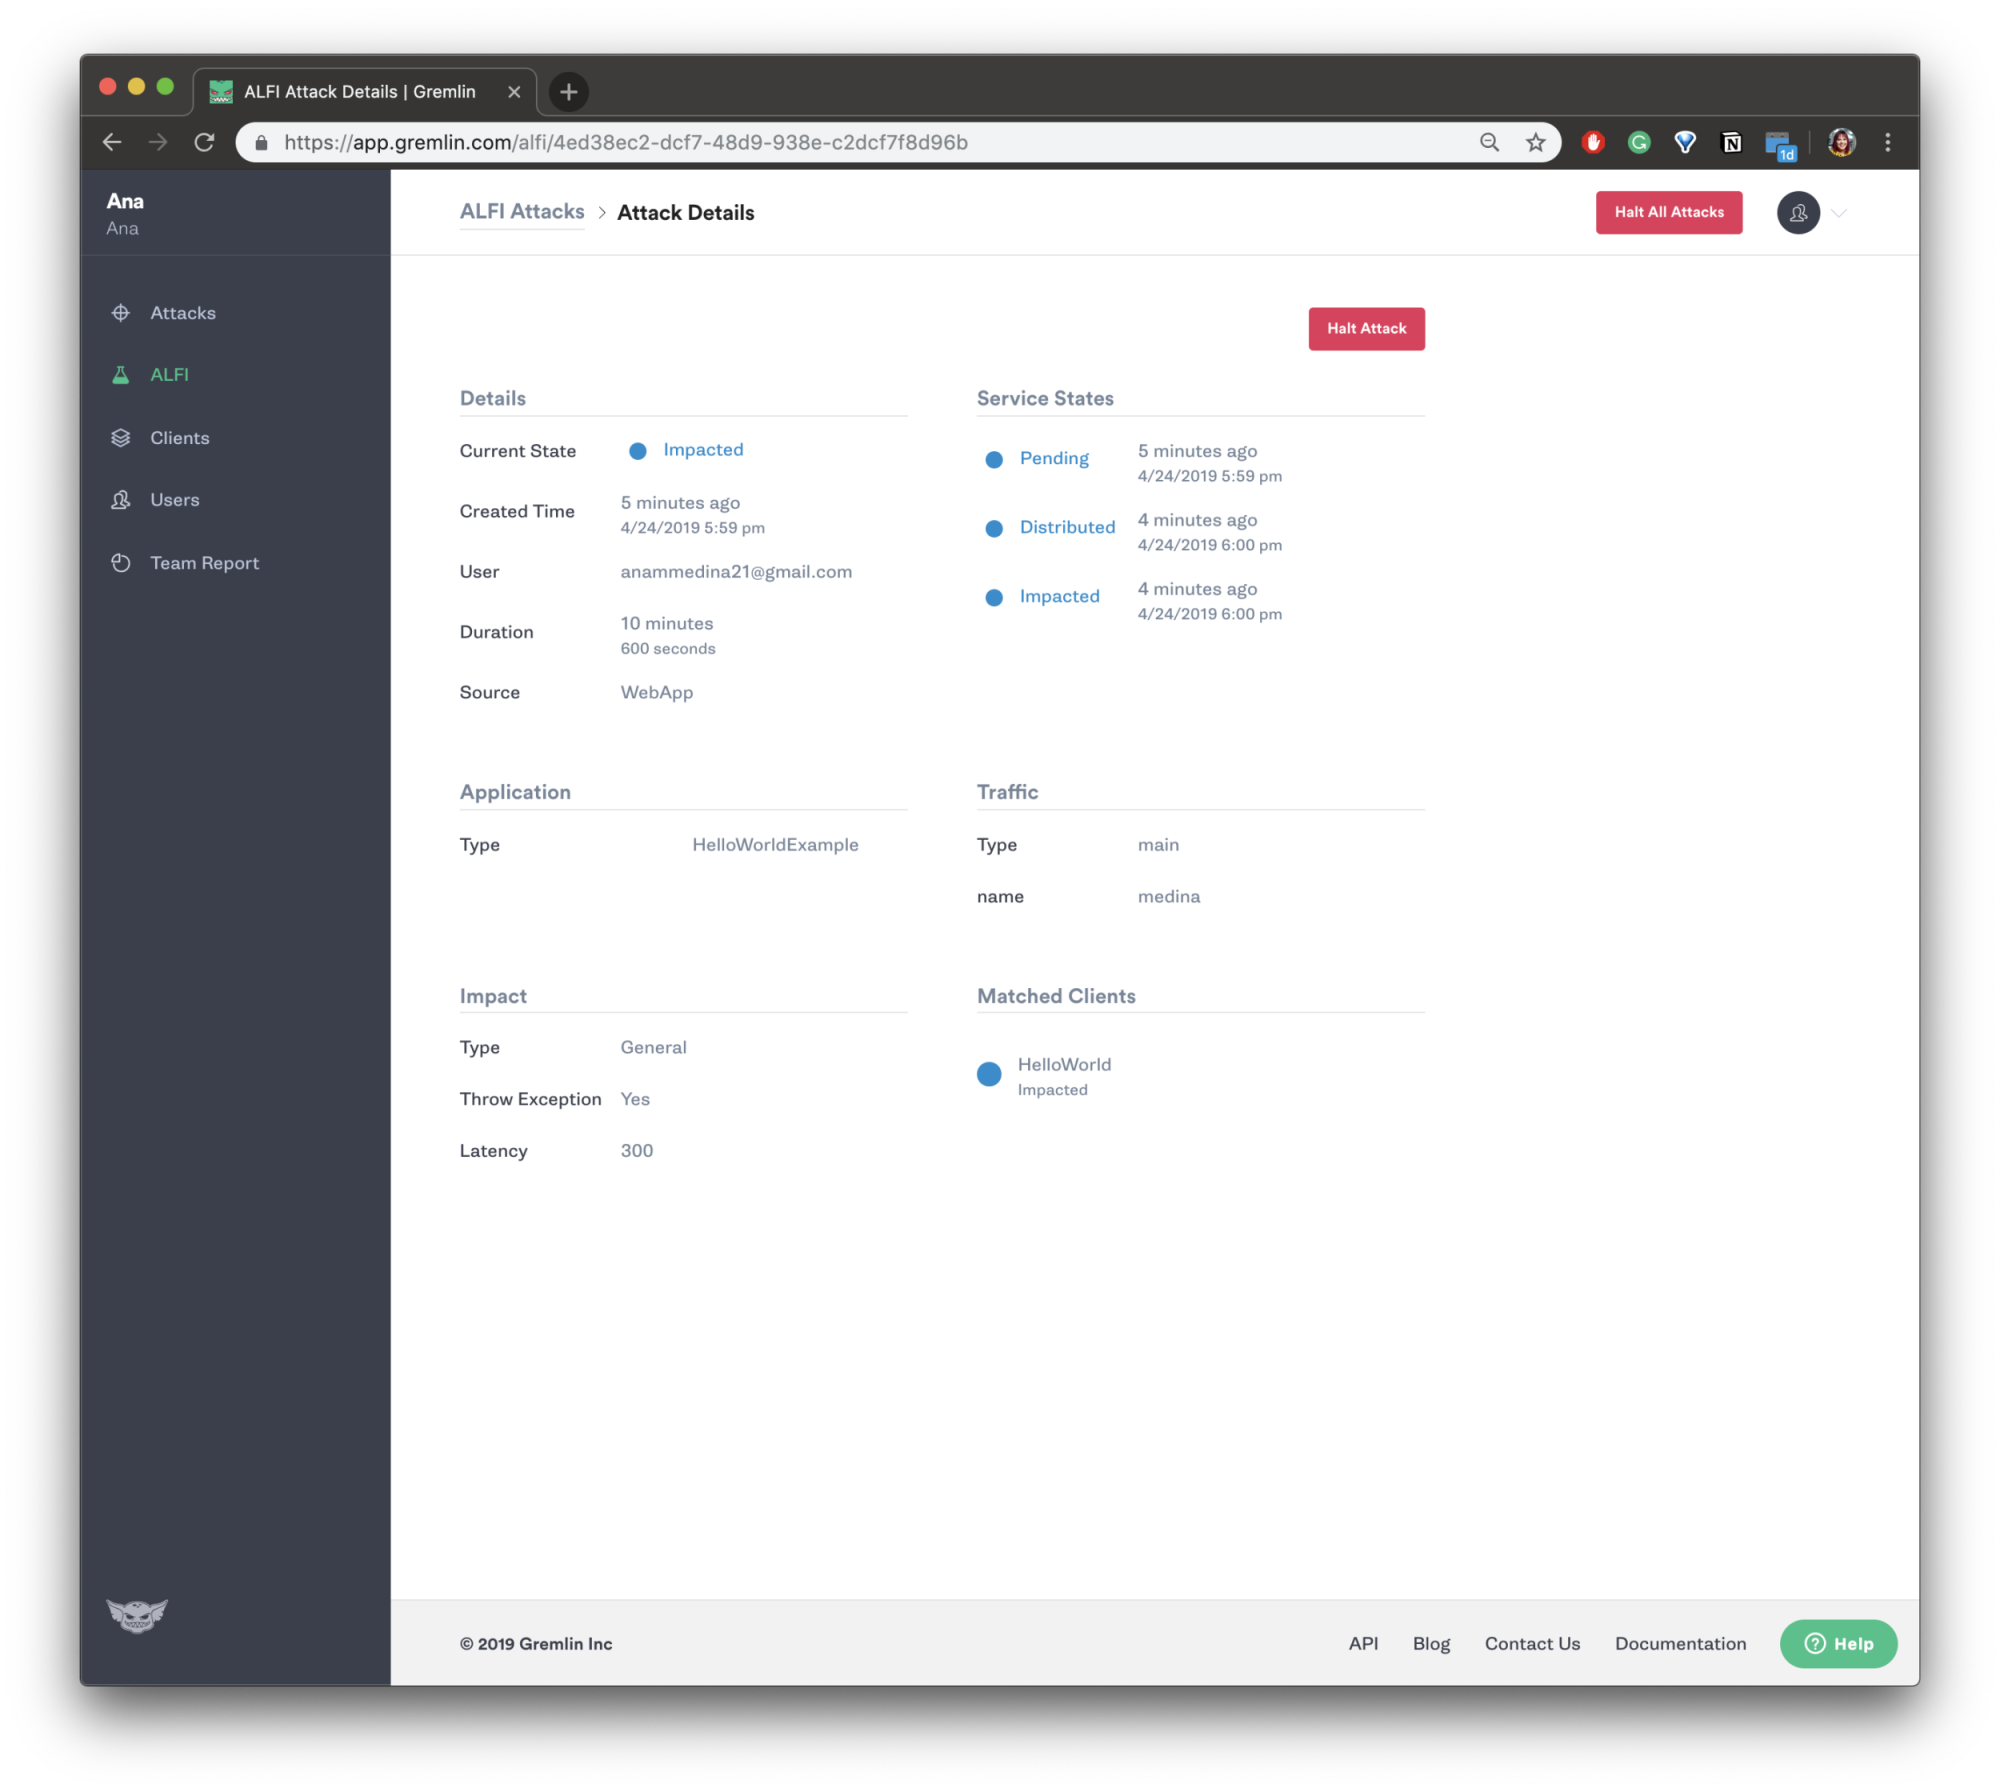
After creating the ALFI Attack, within the duration you have set, you want to run the java application again and see the output display on the console to throw an exception. Go back to the IDE we will go over to ‘Run” and run select ‘HelloWorldApplication.’

The console should display something like:
1com.gremlin.GremlinService - Gremlin injecting ExperimentImpact{experimentGuid='b464e4f3-67bf-42ee-a4e4-f367bfc2eeb8', impact=com.gremlin.Impact{latency_to_add_in_ms="300.0", exception_should_be_thrown="true"}} for : Coordinates{type=main, fields={name=medina}}Exception in thread "main" java.lang.RuntimeException: Fault injected by Gremlinat com.gremlin.GremlinService.a(SourceFile:133)at com.gremlin.GremlinService.applyImpact(SourceFile:143)at com.example.helloworld.HelloWorldApplication.main(HelloWorldApplication.java:26)
The same way we are able to halt Infrastructure attacks, we are to go over to the Gremlin Control Plane to view ALFI Attacks and press the red button on the right that reads ‘Halt All Attacks’, or select the specific attack and Halt that unique one by pressing the red button on the right that reads ‘Halt Attack’.
After the Halt is finished, the UI will reflect the Halt was completed.
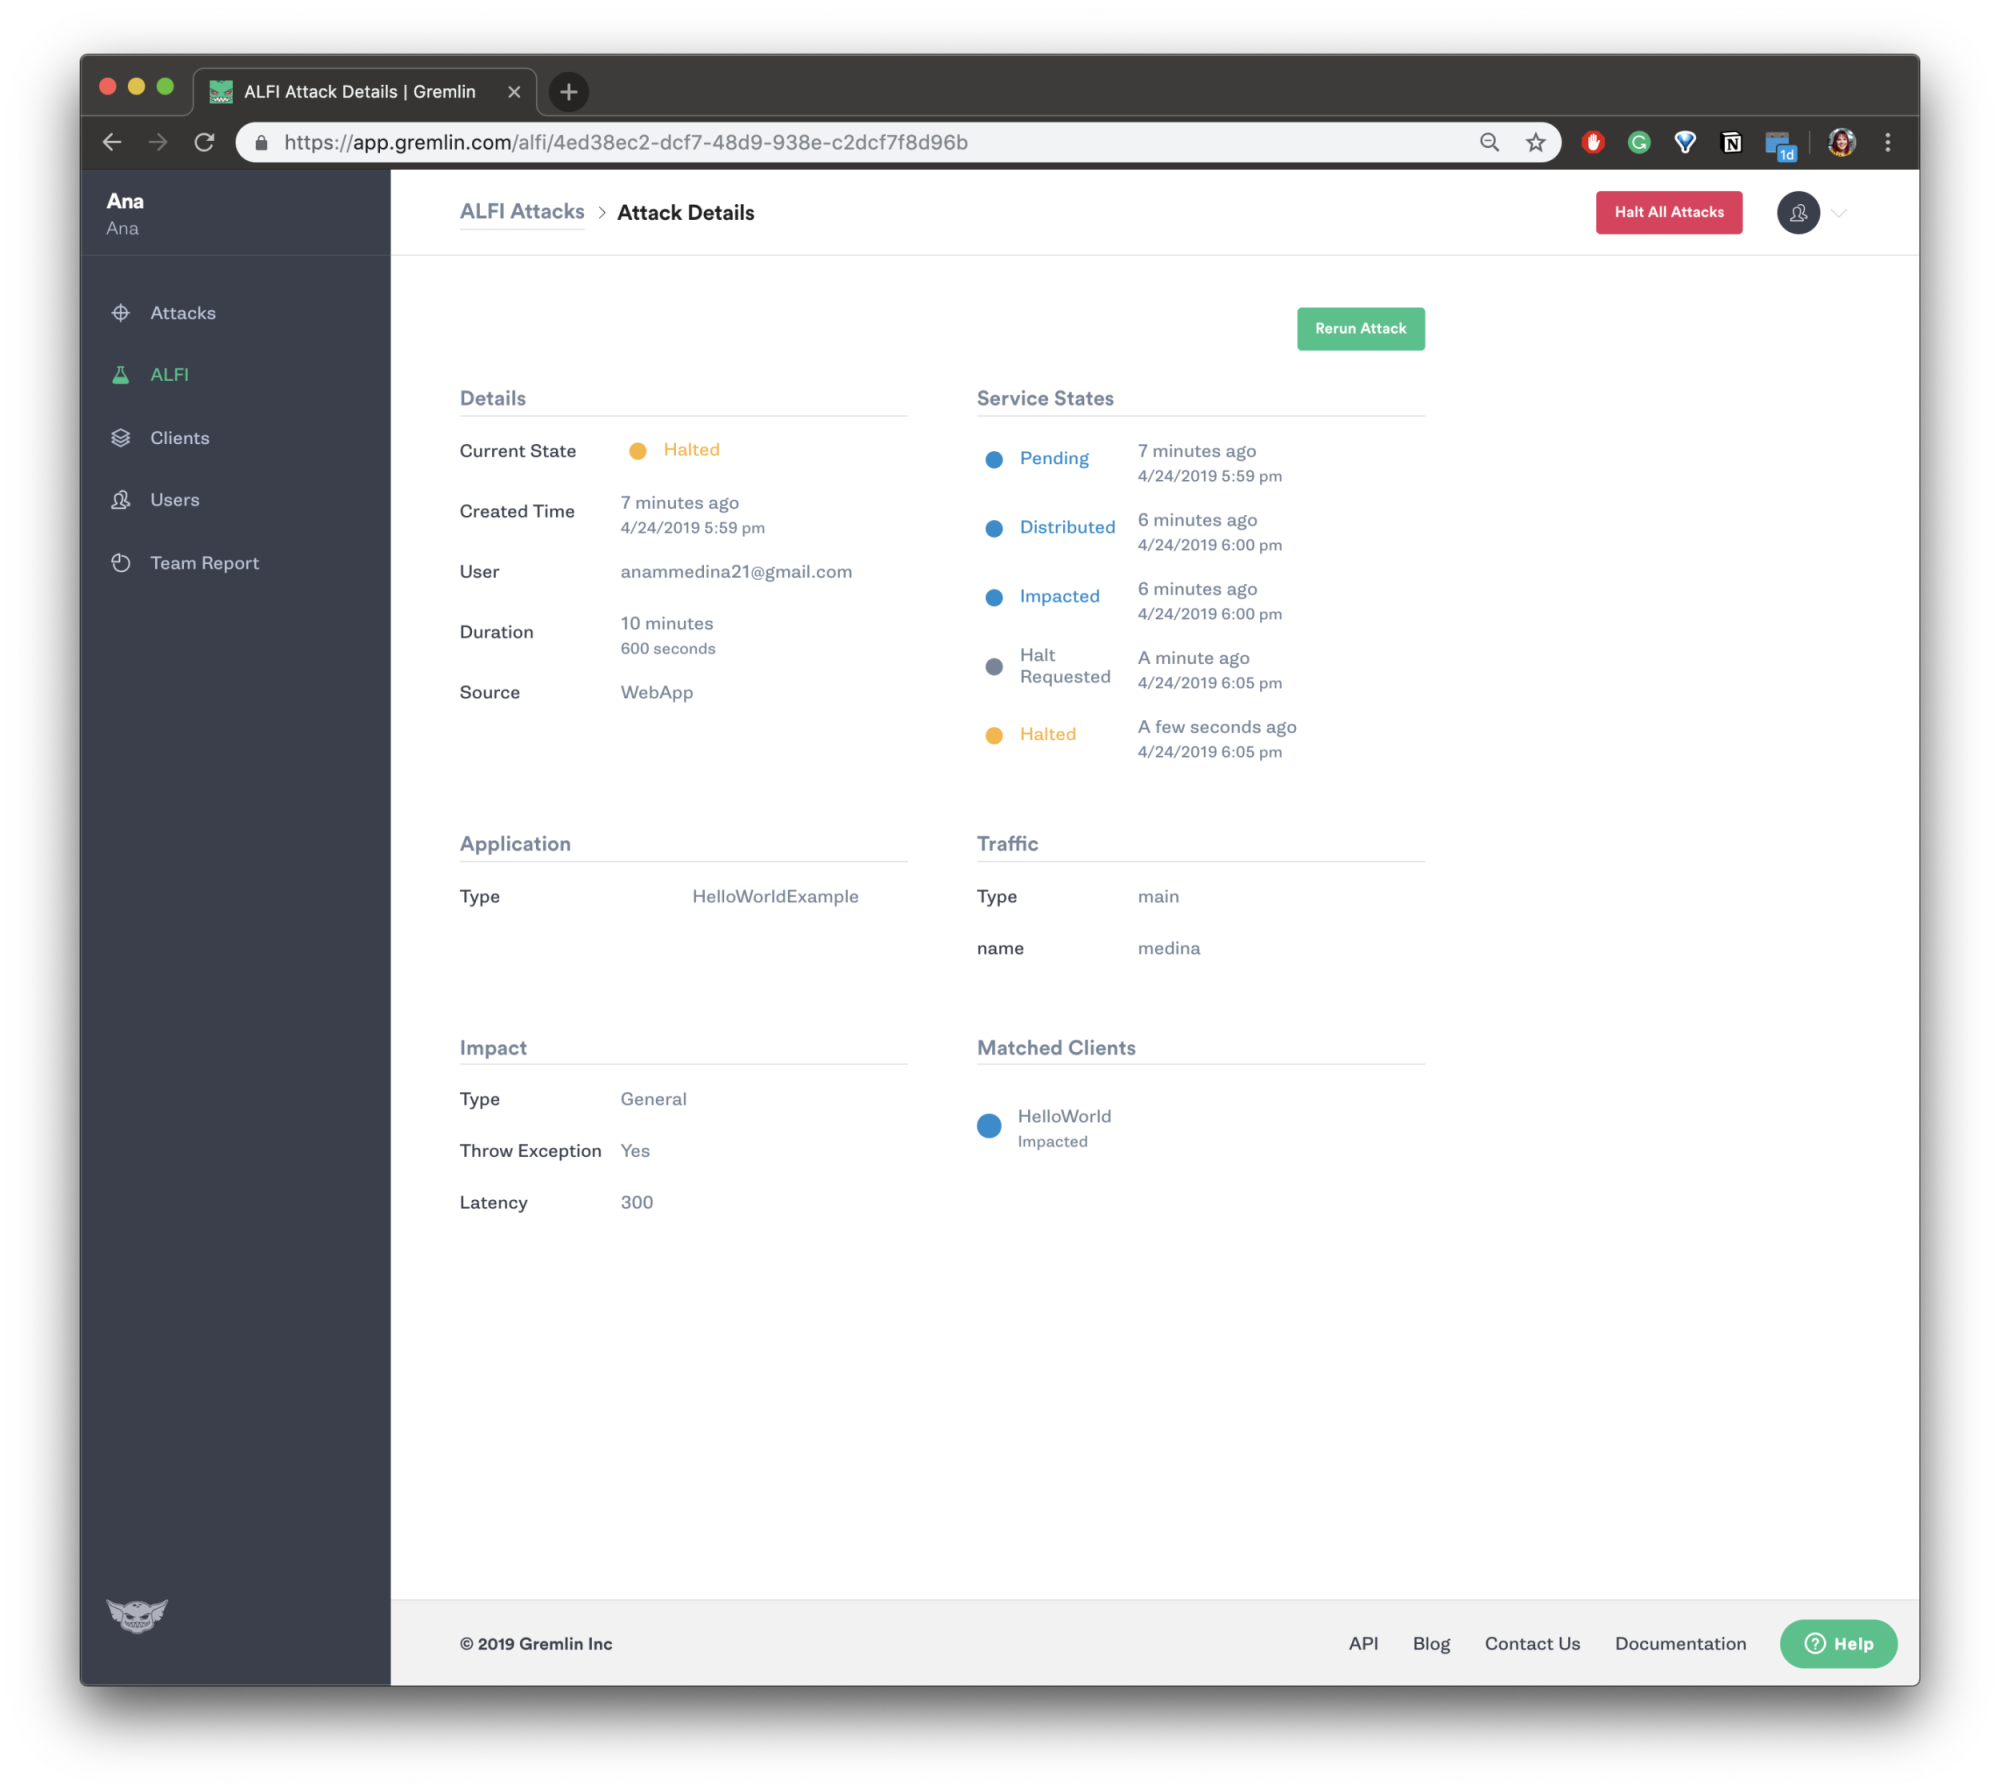
We can also go over to the Gremlin Control Plane to view ALFI Attacks and see their status and confirm they were Halted.

You’ve installed gremlin on your Java Application and validated that you can run the Hello World of Application Level Fault Injection, a startup attack triggered in the main method. If you’d like to see the complete code and import this into Intellij, you can find it on GitHub. If you have any questions at all or are wondering what else you can do with this project, feel free to DM me on the Chaos Slack: @anamedina (join here!).

Gremlin empowers you to proactively root out failure before it causes downtime. See how you can harness chaos to build resilient systems by requesting a demo of Gremlin.
Get started